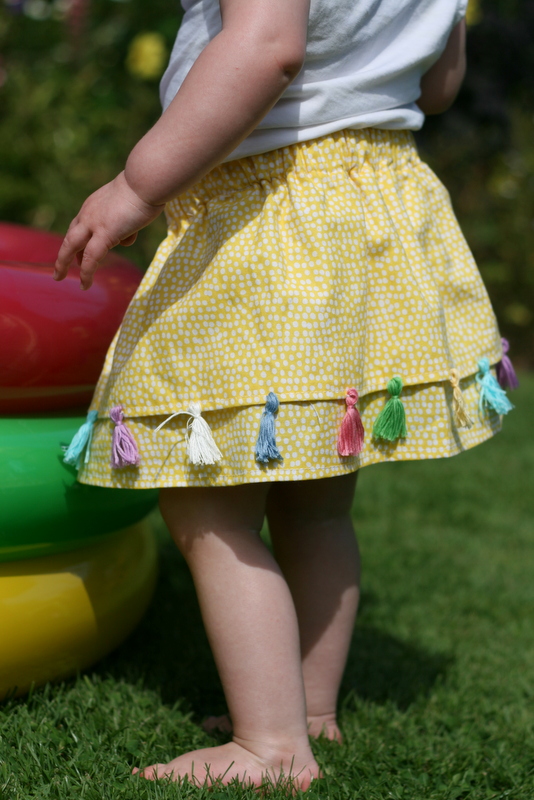
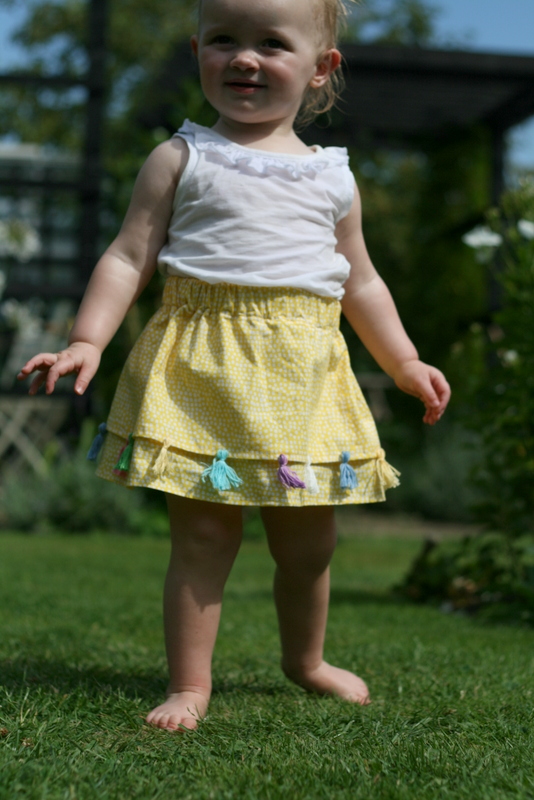
Toddler Tassel Skirt

toddler tassel skirt tutorial

We do a lot of sewing projects here at Little Button Diaries, but we only think to make skirts when the sun comes out. It turns out the last one I made was this time last year! So I thought it was about time to flex my skirt-making muscles again, for this playful, summery skirt.

The pattern I followed came from the excellent website made. As the skirt is basically just two rectangles sewn together, it’s really simple to make and then embellish.

To make this skirt you will need:

  • 3/4 metre of fabric
  • Embroidery thread in a variety of colours
  • 1-inch-wide elastic (to the length of the size of your child’s waist plus 1 inch)
  • 2 safety pins

IMG_6297

1. Begin by working out the dimensions of your skirt. For the waist measurement, measure your child’s waist and double it.

The skirt length is made up of two layers. For the longer layer of the skirt, measure down from the waist to just above the knee and add an inch and a half to this length. For the shorter layer take two inches off the longer layer length.

2. Cut out your two rectangles of fabric, one for each layer of the skirt.

Children's tassel skirt DIY

3. With the longer piece of fabric, fold right sides together and sew with a quarter-inch seam allowance. Repeat with the other piece of fabric. Press the seams out.

4. Hem the top layer of your skirt by folding down the fabric by a quarter of an inch and ironing flat. Sew in place.

Children's tassel skirt DIY

5. Turn the fabrics the right way out and place the longer layer inside the shorter layer. Line up the fabrics so the tops and side seams match. Pin and sew together.

Children's tassel skirt DIY

6. To make the waistband, sew a small hem at the top of the fabric. Place your elastic at the top of the skirt to work out how much fabric you need to fold down. You want the elastic to be able to fit into the casing but not be too loose. Pin and sew the casing. Leave a 2-inch gap at the back of the casing so you can feed the elastic through.

Children's tassel skirt DIY

7. Put safety pins on each end of the elastic and feed it through the top of the skirt. You will have to fiddle a bit to gather the skirt evenly. Overlap each end of the elastic by an inch and sew with a zig zig stitch to secure it.

8. Before the final touches are made, try your skirt on your little button. I found that the skirt was too big on the waist so I cut a section of the elastic out and resewed it back together. Also, check you are happy with the length of the skirt.

Children's tassel skirt DIY

9. Sew the elastic casing shut.

Children's tassel skirt DIY

10. Hem the bottom of the skirt by turning it over a quarter of  a inch, ironing it flat and sewing in place. I made my hem slightly bigger as I wanted the skirt to be shorter. So to finish I trimmed the excess off with pinking shears.

toddler tassel skirt DIY toddler tassel skirt DIY

toddler tassel skirt DIY

11. To make the tassels, wrap the embroidery thread around two of your fingers until you have the thickness you want. Slip it off your fingers and tie a piece of thread securely around the top. Trim the bottom of the tassels so they are all the same length.

toddler tassel skirt DIY toddler tassel skirt DIY

12. I made 20 tassels for the shorter layer and spaced them 2 inches apart. Sew your tassels in place using white cotton.

toddler tassel skirt DIY

toddler tassel skirt DIY

toddler tassel skirt DIY

 ~ Laura xx ~

A Confetti Birthday Cake

 funfetti birthday cake tutorial 16

Laura had a birthday last week so I decided to bake her a cake – and if there’s one thing Laura loves most… well, that would be tea.  But cake is definitely up there! I’ve seen a lot of funfetti cakes out there recently so I decided to make one with the help of Mary Berry. This recipe is adapted from her confetti party cake recipe, but those are tray bakes so I used 2 x 20cm round tins and upped the quantity by a third.

Ingredients
190g butter at room temperature
190g castor sugar
3 eggs
225g self raising flour
1.5 tbsp milk
1.5tbsp vanilla extract
7 tbsp 100s & 1000s/coloured sweets

for the icing:
340g icing sugar
150g butter
1.5tbsp milk
pink food colouring

To decorate:
star shaped cookie cutter
fondant letters
100s & 1000s

preheat the oven to 180c (350f).  Grease and line the tins with baking parchment.

Put all the ingredients for the cake, except the sweets, into a mixing bowl and beat with an electric mixer until very smooth and even in colour. Add the sweets and mix them in with a spoon.

funfetti birthday cake tutorial 1 funfetti birthday cake tutorial 4

scrape the mixture evenly between the two tins and bake for 20-25 minutes until the tops are golden brown. Set on a wire rack to cool.

 funfetti birthday cake tutorial 5 funfetti birthday cake tutorial 6

To make the icing, sift the icing sugar into a bowl, add the butter, milk and beat until smooth and pale (don’t make the mistake I did and get icing sugar mixed up with CORN FLOUR. I mean…. what a moron. I actually mixed a few tablespoons of corn flour in by mistake!). Add a tiny drop of colouring and mix well. Spread on the cake.

 funfetti birthday cake tutorial 8 funfetti birthday cake tutorial 9

place the cookie cutter lightly on top of the centre of the cake and sprinkle a layer of 100s & 1000s on top. Finish with coloured letter sweets.

funfetti birthday cake tutorial 15
funfetti birthday cake tutorial 18 funfetti birthday cake tutorial 14

Happy birthday lau lau.

Tia x

funfetti birthday cake recipe

Make Your Own Toddler Bird Costume

toddler bird costume 2

 It was Little Button’s nursery’s summer fair recently. Children were asked to come in animal costumes to fit with this theme. This was the perfect opportunity to try out my first dressing-up costume and take inspiration from a pin I pinned ages ago on Pinterest.

You can find the full pattern on this blog. I’ve adapted the way you attach the costume to suit younger toddlers.

For this project you will need:

  • 3/4 metre of fabric for wing base
  • Strips of 10 different fabrics for feather rows
  • 80 cm of bias binding
  • 80cm of ribbon
  • Safety pin
  • Thread to match base fabric

bird costume DIY

Cut two pieces of fabric measuring 13 inches across and down for the base of the wings.  Cut them to a rounded shape, as shown above.

Bird cotume diy

 For the rows of feathers, draw a template on paper. This should be 10 inches wide, with five semicircles, each measuring 2 inches deep, as above.

bird costume diy

I used 10 different fabrics. Bright and sparkly fabric worked really well as they caught the sun. I worked out which order I wanted my coloured fabric to go in and started cutting around my template – this is the time-consuming bit!

Bird costume diy bird costume DIY

To sew the rows of feathers onto the wing base, start at the bottom of your base fabric and pin the first row of feathers to the wing. The bottom row wants to be poking out slightly over the edge of the fabric, to give a scalloped effect. Sew in place. Then pin the next row of feathers above the first so there is again a slight overlap and sew in place. Repeat until the wings are full.

   Bird costume DIY bird costume DIY

 With pinking shears, trim the vertical edges of the wings so they are even.

To attach the wings together, use bias binding. Pin the binding along the top of the wings. You want to leave a gap of a few inches between the wings, to allow for healthy flapping! Sew in place and trim any excess binding from the ends.

bird costume diy #craft bird costume diy #craft

To attach the wings to your toddler, add some ribbon at the end of each wing to form two wrist ties – alternatively you can use safety pins to attach the wings to a long-sleeved top. I also put a safety pin in the middle of the wings at neck level to stop the wings sagging.

toddler bird costume

IMG_5274

~ Laura xx ~


A Baby Sunhat Tutorial

baby sunhat tutorial

Oh dear me…I’m ashamed to say that my little one got a bit of a burnt head the other day! It was only a tiny bit… but I feel very guilty. So to make up for it, I decided to make her a nice new sunhat. I find the ones in the shops are all a bit samey and boring. This one is bright, reversible and SO easy to make (so easy in fact that I made two). I found a really lovely tutorial and template here on www.purlbee.com.

This hat is to fit a baby aged 0-3 months.

You will need:
2 contrasting pieces of fabric (about a fat 1/4 of each)
Iron on interfacing
Bias binding
Ribbon
Sewing machine

1) begin by printing out Purlbee’s brilliant template (available here). Cut 4 dome pieces from the outer fabric and 4 from the lining. Then cut the rim pieces – two of each from the outer fabric, lining and interfacing, as shown below.

sun hat 1 sun hat 2

2) Put the outer pieces together in pairs, right sides together. Pin and sew along one side with a 1/4 inch seam allowance (which will be the allowance for the whole project). Open out and press with the iron. Pin the sewn pieces right sides together and sew all the way round the curved edge to create the basic hat shape. NB its a good idea to test this out on your child at this point, bearing in mind that the finished hat will be smaller still. But if it doesn’t fit now… you want to know NOW!

sun hat 5 sun hat 4

3) repeat the above process with the lining pieces, so that you have two domes.

sun hat 7

4) Attach the interfacing by pressing with the iron onto the outer rim pieces. Then pin these, right sides together, along the flat edges and sew. Press flat.

sun hat 8

5) Attach to the hat by pinning the inside of the rim to the edge of the dome, right sides together (bit confusing… see the pic below!). Sew in place. Repeat the process with the lining BUT this time, attach the ribbons along the seam before sewing, as below.

sun hat 9 sun hat 10

6) Now to attach the inner and outer pieces. Place each piece wrong side together and sew a small stitch at the very top centre of the hat to hold in place. Now, lining the seams up, pin the rim pieces together. Sew along the inside of the rim.

sun hat 11  sun hat 12

7) Finally, attach the bias binding by pinning all the way along the rim as  below. Sew, fold over and sew once more. If you haven’t used binding before there are some great Youtube tutorials that can explain the process way more clearly than my brain is capable!

sun hat 13 sun hat 14

sun hat 15 sun hat 17

All finished! Whoop di doo, no more burning. And it looks more complicated to make than it actually IS, which is always a bonus.

sunhat tutorial b sunhat tutorial asunhat a
sun hat 19

Our Latest Post for Hobbycraft: A floral centrepiece

fabric flower centerpiece

Our latest post for Hobbycraft is now live. We decided to use some different products from their store which we hadn’t tried before. We used this floral number centrepiece we made at our little blog birthday party. It was simple to make and looks great as the table decoration. For the full tutorial click here.

one year 4one year 1

For our previous Hobbycraft projects click on the pictures below:

bunny 4 tassel necklace 13 seahorse 27

~ Laura & Tia xx ~

An Easy Lined Zip Purse Tutorial.

zip purse tutorial

I’ve always been a bit of a guess worker when it comes to sewing. I don’t really follow patterns, I cut corners and I skip things like lining and finishing seams. But recently I’ve been wanting to do things ‘properly’ so I’ve been trying to teach myself the correct way to make things! I started with a little make-up purse, I love it! If you want to make one too…

(To make a bag measuring 8×5”)
…You will need:

2 pieces of fabric measuring 8.5”x 5.5” (plus extra strips for the zip ends)
2 pieces of lining fabric the same length
8” zip
sewing machine with zipper foot

Make the zip end covers: Cut 2 scraps of fabric measuring 3”x1.5”. Press them each in half and then fold the ends back 1/4” and press again. Place the fabric over the ends of the zip and pin in place.
Sew along the pin with 2 lines of neat stitching.

purse 3  purse 4

Pin the first side of the purse: To assemble the purse, place your outer fabric in front of you face up. Then place the zip along the top edge of the fabric, face down (the top of the zip and the top of the fabric should line up). Finally, place the lining fabric on top face down. Pin in place.

purse 6

Sew the first side of the purse: Open the zip half way. Put the zipper foot onto your sewing machine and, feeling the edge of the zip with your finger, sew along the length of the zip making sure the zipper foot presses alongside it. When you get halfway, lift the foot and gently move it back to a part that has already been sewn and continue.

purse 7

Sew the second side of the purse: To make the other side of the purse, follow the same pattern. Take the other piece of outer fabric, place it face up. Take the fabric with the sewn on zip and place it on top with the zip face down (lining the zip edge with the fabric edge just as before). Finally place the lining fabric on top face down. Pin and sew along the zip as before.

purse 8 purse 11

Top Stitch along the zip: Turn the fabric the right way round and top stitch along the length of the zip, holding the fabric taut as you do so.

purse 12

Sew the purse edges: Open your zip halfway. This is important! It creates the hole to be able to turn the purse the right way round… So if you forget you’ll be unpicking. I hate unpicking. Pin the outer fabric together, right sides facing. Do the same with the lining fabric, with the zip ends pointing downwards into the lining (see the photo below on the right). Sew with a 1/2” seam allowance around the purse, leaving a 2” gap at the bottom to turn out.

purse 13 purse 14

Snip the excess: Carefully snip the excess fabric from the zip ends so that the fabric does not bulge at the edges. Do the same around the corners of the purse.

Turn out twice: Now for the really satisfying but also slightly confusing bit. Turn the bag out through the gap in the lining, so you have an inside out purse. Use a pencil to poke the corners out. Then turn again, through the open zip so that your bag is the right way round. Hoorah! How quickly it goes from messy mass of fabric and thread to a proper purse.

purse 15 purse 2

Close up the lining: Pull out the lining, and sew the hole shut. You could do this by hand if you want it to be neat (I couldn’t be bothered… Machine is way quicker!).

And your lovely purse is finished!

purse 20 purse 22
purse 21

Tia xx

Rock ‘n’ Roll Peanut Butter & Vanilla Cupcakes

IMG_4773

It was my husband’s birthday last week so I decided to combine two of his favourite things, peanut butter and vinyl records, to make these cupcakes. The cakes have a gooey peanut butter filling and are topped with vanilla buttercream.

To make 12 cupcakes, you will need:

  • 250g plain flour
  • 2 tsp baking powder
  • 60g unsalted butter
  • 250g soft light brown sugar
  • 120g peanut butter
  • 1 tsp vanilla extract
  • 100ml milk

For the filling:

  • 12 tsp peanut butter

For the buttercream:

  • 175g softened butter
  • 350g icing sugar
  • 2 tbsp milk
  • 7 drops vanilla extract

For the vinyl record toppers:

  • Ready to roll icing in black, red, yellow, blue and green

peanut butter cupcakes

Begin by preheating the oven to 180 degrees. Sift the flour and baking powder together and line the cupcake tray with cupcake cases.

peanut butter cupcakes peanut butter cupcakes

Beat the butter, sugar and peanut butter together until mixed. Next, beat in the eggs and vanilla extract.

peanut butter cupcakes

Fold in the flour and milk to the mixture and mix until combined. Spoon the mixture into the cupcake cases until they are half full. Smooth the top over with the back of the spoon so they are even. Bake for 25 minutes or until the cakes are golden brown.

IMG_4737

Once the cupcakes are cooled scoop out a small section in the middle of the cake and put a teaspoon of peanut butter into the hole.

peanut butter cupcakes

To make the buttercream topping, beat the butter until it is fluffy. Sift in the icing sugar, milk and vanilla extract and beat until smooth and completely combined.

IMG_4746 IMG_4747

Dollop a spoonful of icing on top of the cake and, using a spatula, smooth the buttercream downwards towards the cupcake case. Smooth the top round in a circular motion and neaten off any uneven edges.

IMG_4758 IMG_4767

To make the mini vinyl record toppers roll out your black ready to roll icing to 6mm thick. Using a circular cutter cut out the vinyl. Roll your other colours out to 4mm thick and using a smaller cutter cut out the circles. To attach the coloured circles to the black use a small amount of icing sugar mixed with water. Add grooves to your record using a skewer, then poke a whole in the centre.

IMG_4782

The cakes were a hit with the birthday boy!

IMG_4793 Little Button Diaires

~ Laura xx ~

For more peanut butter recipes click on the photos below:

tiffin1peanut butter heartsbiscuits-7

Make Your Own Toy Robot

toy robot tutorial

We’re both big fans of Lamaze toys, and one of Little Button’s very favourite friends from day one has been Rusty the Robot.

He’s been with her on countless adventures – and she likes Rusty so much that I decided to make a robo-replacement so he could have the odd day off. Rather than replicate Rusty’s boyish charm, I decided to make a girl robot.

For this project you will need:

  • 0.75m of green fabric
  • Matching thread
  • Fat quarter in pink fabric
  • 20 cm elastic
  • Toy stuffing
  • Rattle / tic tacs box
  • 2 black buttons
  • Black embroidery floss
  • Scrap of pink felt
  • Fabric glue

Little Button Diaires| how to make a toy robot DIY

1. Begin by cutting out your head, body and feet pieces as follows:

For the head cube you need 6 squares of green fabric each measuring 9cm x 9cm.

For the body cube you need 4 squares of green fabric measuring 11cm x 11cm and 2 squares of pink fabric measuring 11cm x 11cm.

For the feet cut 4 squares of green fabric measuring 7cm x 7cm and 2 squares of pink fabric of the same size.

Little Button Diaires| how to make a toy robot DIY

2. Sew your head, body and feet squares to make cubes. These all use the same method. Begin by laying out your square as in the picture above. Pin and sew the four vertical squares right sides together so they form a joined-up line.

For the body and feet cubes the contrasting fabric needs to be the two outside squares so they are opposite each other when the cube is made.

Next sew the two other squares onto the second square down.

Little Button Diaires| how to make a toy robot DIY

Then you need to pin and sew each side that is next to each other (right sides together) to form a cube.

Little Button Diaires| how to make a toy robot DIY

When you reach the final side to be sewn leave a 3cm gap. Next, turn the cube the right way out making sure you push the corners out into points.

Little Button Diaires| how to make a toy robot DIY

3. Stuff the cube with toy stuffing and sew up the gap by hand using a slip stitch.

For more explanation see our Baby fabric cube tutorial.

Little Button Diaires| how to make a toy robot DIY

Optional: Add a bell / rattle / packet of tic tacs into the body cube in the middle of the stuffing.

Little Button Diaires| how to make a toy robot DIY Little Button Diaires| how to make a toy robot DIY

4. For the arms and legs cut strips of fabric 15cm long and 10cm wide. Fold the fabric in half right sides together and sew together. Turn the fabric the right way out. To make the arms ruffled you need to insert a piece of elastic 7cm long into each arm. Scrunch up the fabric to the same length as the elastic and secure in place with a pin.  To neaten the raw edges turn them inside the fabric and sew closed. Repeat this for all the arms and legs.

Little Button Diaires| how to make a toy robot DIY Little Button Diaires| how to make a toy robot DIY

5. Now it’s time to assemble your robot. Hand sew the head cube onto the body cube in the centre. Make sure the contrasting pink fabric on the body cube is at the side of the body where the arms will go. Then hand sew the arms onto the side of the body cube.

Hand sew the legs onto the bottom of the body cube in the middle and then sew the feet cubes onto the legs. Make sure that you position the cubes so the pink fabric is facing out when the robot is sitting.

how to make a toy robot DIY

6. Finally sew the face. For the bow I followed Tia’s tutorial on making felt hair bows and then hand sewed onto the side of the head. Next hand sew the buttons on for eyes using black embroidery thread and hand-stitch eyelashes above the eyes.

DIY robot toy

Isn’t she beautiful (for a robot)? We called her Betty, and I’m sure she’ll be having many adventures with Rusty and Little Button this summer.

Make your own toy robot DIY Make your own toy robot DIY

Click on the pictures below to see our other stuffed toy creations:

bunny 4denim whale postwobbly1

 ~ Laura xx ~


Two-Cup Tea Bags DIY

We’re really excited to have our very good friend Miss Amy Phipps writing the post today. Amy is one of the very first people we met when we moved to Brighton, and is one half of the creative superstars Super+Super. Amy’s blog, M.A.P., explores a creative way of life on a shoestring. You’ll find vegan recipes, craft DIYs and thrifty wardrobe ideas on there, and we love it. Here she is with her two-cup tea bag DIY. 

2 cup DIY teabags

If like me you drink a lot of herbal tea and get a bit bored of what’s available in the shop, and how much it costs to keep a good stock of flavours in the cupboard, then this project might be just up your street! Not only can you blend your favourite varieties, but by using 2 tsp per bag you can make a magical 2 cup bag. This will keep you going for a while and can be topped up with hot water repeatedly, or used to make a whole pot if you’d prefer. What’s not to like about that! Perfect for herbal tea addicts.

You will need:

  • Cafetiere filter paper
  • Dried tea leaves, mint ‘Infusion’ and dried camomile ‘infusion’*
  • Scissors
  • Sewing machine
  • Machine thread
  • Thick cotton thread
  • Tape measure
  • A big tea cup or pot

2 Cup tea bag DIY

* I bought my dried ingredients from a local store called Ecostream refill store where you buy by the weight.

So let’s get started! 

2 cup tea bag DIY

With the folded edge of the filter paper at the bottom measure a width of approx 6cm and then cut straight up to the top curved edge making a rectangle out of the filter.

2 cup tea bag DIY

Neaten the top by squaring off with scissors, and thread your sewing machine.

2 CUP teabag DIY

Sew along both sides making sure your folded edge lies along the bottom. Try to leave 0.5cm allowance on either side! Tie off the ends and snip them short as you go along to save yourself getting all tangled up.
2 CUP teabag DIY

Now you are ready to fill your bag! 2 tsp of your dried tea mix should be perfect, I used half and half camomile and mint… my current favourite!

2 CUP Teabag DIY

To seal, you need to fold the top down 1cm and crease firmly.

2 cup teabag DIY

Next, fold the corners in to meet the bottom of the first folded edge.

2 cup DIY teabags

Cut a few lengths of the thicker thread, approx 10cm These will be your tea bag strings!

2 cup DIY teabags
Now holding the corners flat and keeping the string evenly in the centre of your bag, sew across the folded top in one neat line. The trick here is to start on top of the folded corner furthest away from you pinning it down and continue all the way over to the nearest corner doing the same here.Previous messageNext messageBack to messages

2 cup DIY teabags

I have used off-cuts from the filter paper to make tabs for the string which is done by repeating the previous step.

2 cup DIY teabags

For more craft and vegan cooking ideas visit www.missamyphipps.blogspot.com

Follow Amy on Twitter @MissAmyPhipps
Like her on Facebook www.facebook.com/missamyphipps
OR visit her new Esty here! https://www.etsy.com/uk/shop/MissAmyPhipps
To see our guest post, homemade bounty bars, click on the picture!
little button diaries make your own bounty bars


DIY copper Magazine Rack

magazine rack 7

A friend of mine recently showed me how easy it is to make things out of copper piping (she made an awesome table with some piping and scaffold boards….clever girl). You don’t need to be a fancy welder, all you need is some strong glue and a little device that cuts the copper pipe with a simple twist. I found this post by the awesome fallfordiycom which uses wooden poles alongside copper joins. I wanted the full copper look on my magazine rack so I went and bought myself some piping – the whole thing cost me under £20 (but I did have the fabric already).

You will need:
1.7m of 15mm copper piping (cut to measurements below)
8 x 15mm copper pipe joins
15mm Copper pipe cutter (select the size based on the diameter of your piping)
Epoxy glue, like Araldite
130 X 35cm Strong fabric

1) Begin by cutting your copper to the following sizes:
2 x 40cm
2 x 30cm
2 x 15cm

magazine rack 2 magazine rack 5

2) Begin by assembling the frame of the rack. On a flat surface, take the shortest pipes first and glue the joints in place on each end. Then glue the 30cm pipes into these joints to create a sort of square “C” shape. Keep the pipes flat on the surface to ensure they are straight when moved upright.

magazine rack 6

Now take one of your “C”s and glue the joints and long pipes in place as in the pic below. Glue the final joints in place on the other “C” (make sure they’re straight!) but DON’T glue the long pipes in – if you do it you won’t be able to put the fabric on… and that would be a bit annoying (as well as being a rather useless magazine rack). Once its all dry the final piece can be slotted in place, allowing you to remove the fabric for cleaning.

magazine rack 13 magazine rack 14

With the frame assembled, its time to make the fabric section. begin by sewing a 1cm hem along both edges of the fabric.

Lay the fabric flat and fold both ends into the middle. Mark with chalk the centre of each fold and then open the fabric out again. Using a bowl or circular template, draw a circle around these central points to create your handle holes (which, once re-folded, will become semicircles). Allowing an additional cm to fold in, cut the hole out, snip around the edges, press flat and sew.

magazine rack 3 magazine rack 4

Refold the fabric ensuring the cut outs line up perfectly. Sew the fabric along the join in the middle to create a piece of fabric that is half the length with a semi circle at each end.

magazine rack 15

Then sew the edges along your original hem line once more – ensuring you leave a 1inch gap at each end to enable you to feed the pipe through. Keeping this 1inch gap at the top sew the circles together (optional).

 magazine rack 16 magazine rack 17

Now place the fabric in place on the rack and hoorahhh! A shiny new magazine rack that can immediately be filled with loads of magazines/papers and torn out bits of information that you will never have any time to read.

   magazine rack 18

 magazine rack 10  magazine rack 8

copper pipe magazine rack tutorial

Tia x