Our First Paperchase Project!

paper chase paper train tutorial

We’re so excited to share our news that we are now going to be working with high street stationers, Paperchase, on their recently launched blog, The Journal. We are probably the two biggest fans of Paperchase out there (we both recently bought a whole load of matching stationery from there… losers!) so to be working with them makes us really happy.

They asked us to create a half term project for kids using their Spectrascope range of paper and card. So we created a paper train to be made with the help of your little ones. For the step-by-step tutorial, check out our post over on The Journal.

LBDtrain_step8

If you like what we do and have two minutes spare, we’d love it if you could vote for us for the MADs (Mum and Dad Awards) for Best Craft Blog. Click on the picture below, enter a blog of the year first, then enter us for Best Craft Blog. Thank you!!

MADS_BADGE_EXAMPLE_NOMINATED.fw_

~ Laura & Tia xx ~

Mrs Flowerpot Lady

DIY flower pot tutorial

We love a challenge, especially a craft one! Hobbycraft set us the challenge of making something out of just a few items selected for us, and we decided to make a lovely little flower pot lady. Mrs. Pot is easy to make, takes very little time and is the perfect craft to do with little ones. For the full tutorial on how to make her visit Hobbycraft!

flower pot lady tutorial 7

 ~ Tia & Laura xx ~

Nap time crafts: Polymer Princesses

polymer princess little button diaries 13

For another project, I’ve recently been making a lot of very cute and girly things that I haven’t been able to give to Amelie. It’s made me feel so bad, she comes into my craft room (I say craft room, I’ve basically stolen the conservatory and renamed it. Anyone else find that craft stuff seems to just breed?!), she gets all excited and I have to quickly remove her from the area before she creates damage. So I decided to make her some little princesses from fimo. I gave her some lumps too (small ones, this stuff is expensive!) and she made some grotesque looking warped princesses too.

These are really easy to make, and take about 15 minutes per doll. These ones are only tiny, about 5cm high, but you could make them any size.

You will Need (Per Princess):

  • Polymer clay (I use fimo soft) – about 1cm lump of skin tone and 2cm in your chosen dress colour
  • Super Glue
  • Embroidery thread for hair
  • black and red permanent fine liner

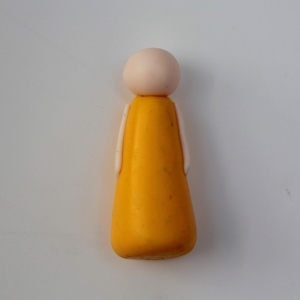
1. Thoroughly clean your hands and dry them on something non-fluffy. Odd as that might sound, this stuff picks up dust and fluff and quickly looks manky!! Begin by rolling the lumps you need. From pink, roll a pea sized ball for the head and two thin sausages, about 2cm long, for the arms. Then take the body lump – here I’m making Belle (obviously…) so I’ve used dark yellow. Roll the lump into a ball, then a sausage, then roll one end so that it is slightly narrower at the top. Press the bottom on the work surface to flatten and make it stand.

polymer princess little button diaries 1

2. Press the arms onto the side of the body, and the head on the top. You can learn from my mistakes here as I didn’t secure the head enough (it popped off on first play and had to be glued back), so really make sure the pieces are adhered to one another, you can use a cocktail stick or a knife to blend the edges together.

polymer princess little button diaries 2

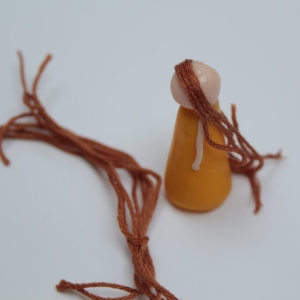
3. Place the princess(es) on a lined baking tray and bake in the oven according the manufacturers guidelines. Whilst they cook, prepare the hair. Create a loop of embroidery thread around your fingers, about 10cm long, and wrap the thread around 6 times. Cut through the loops to create strands. Once the dolls are out of the oven and cooled, place some glue onto the back of the head and stick the strands on one by one, starting from the front and working your way down till there are no more bald bits!

polymer princess little button diaries 3 polymer princess little button diaries 4

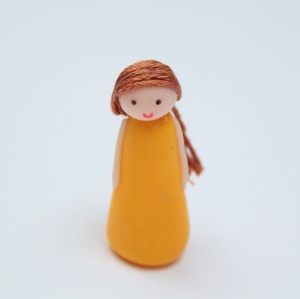
4. Tie or plait the hair however you like, then take a fine permanent pen and draw on a smiley little face.

polymer princess little button diaries 5 polymer princess little button diaries 6

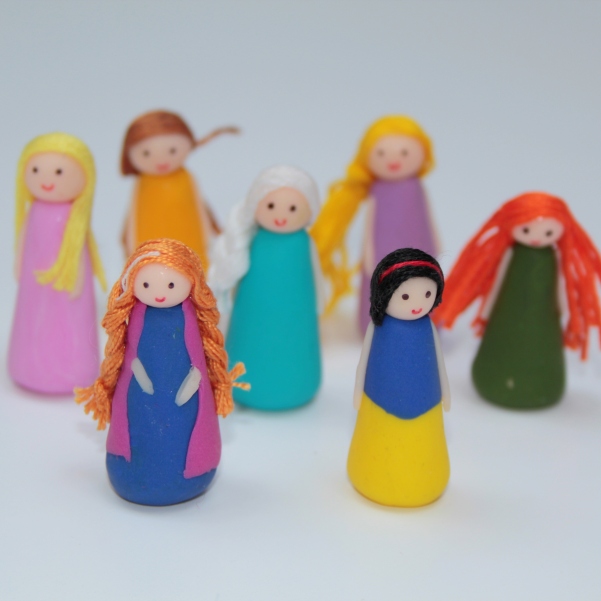
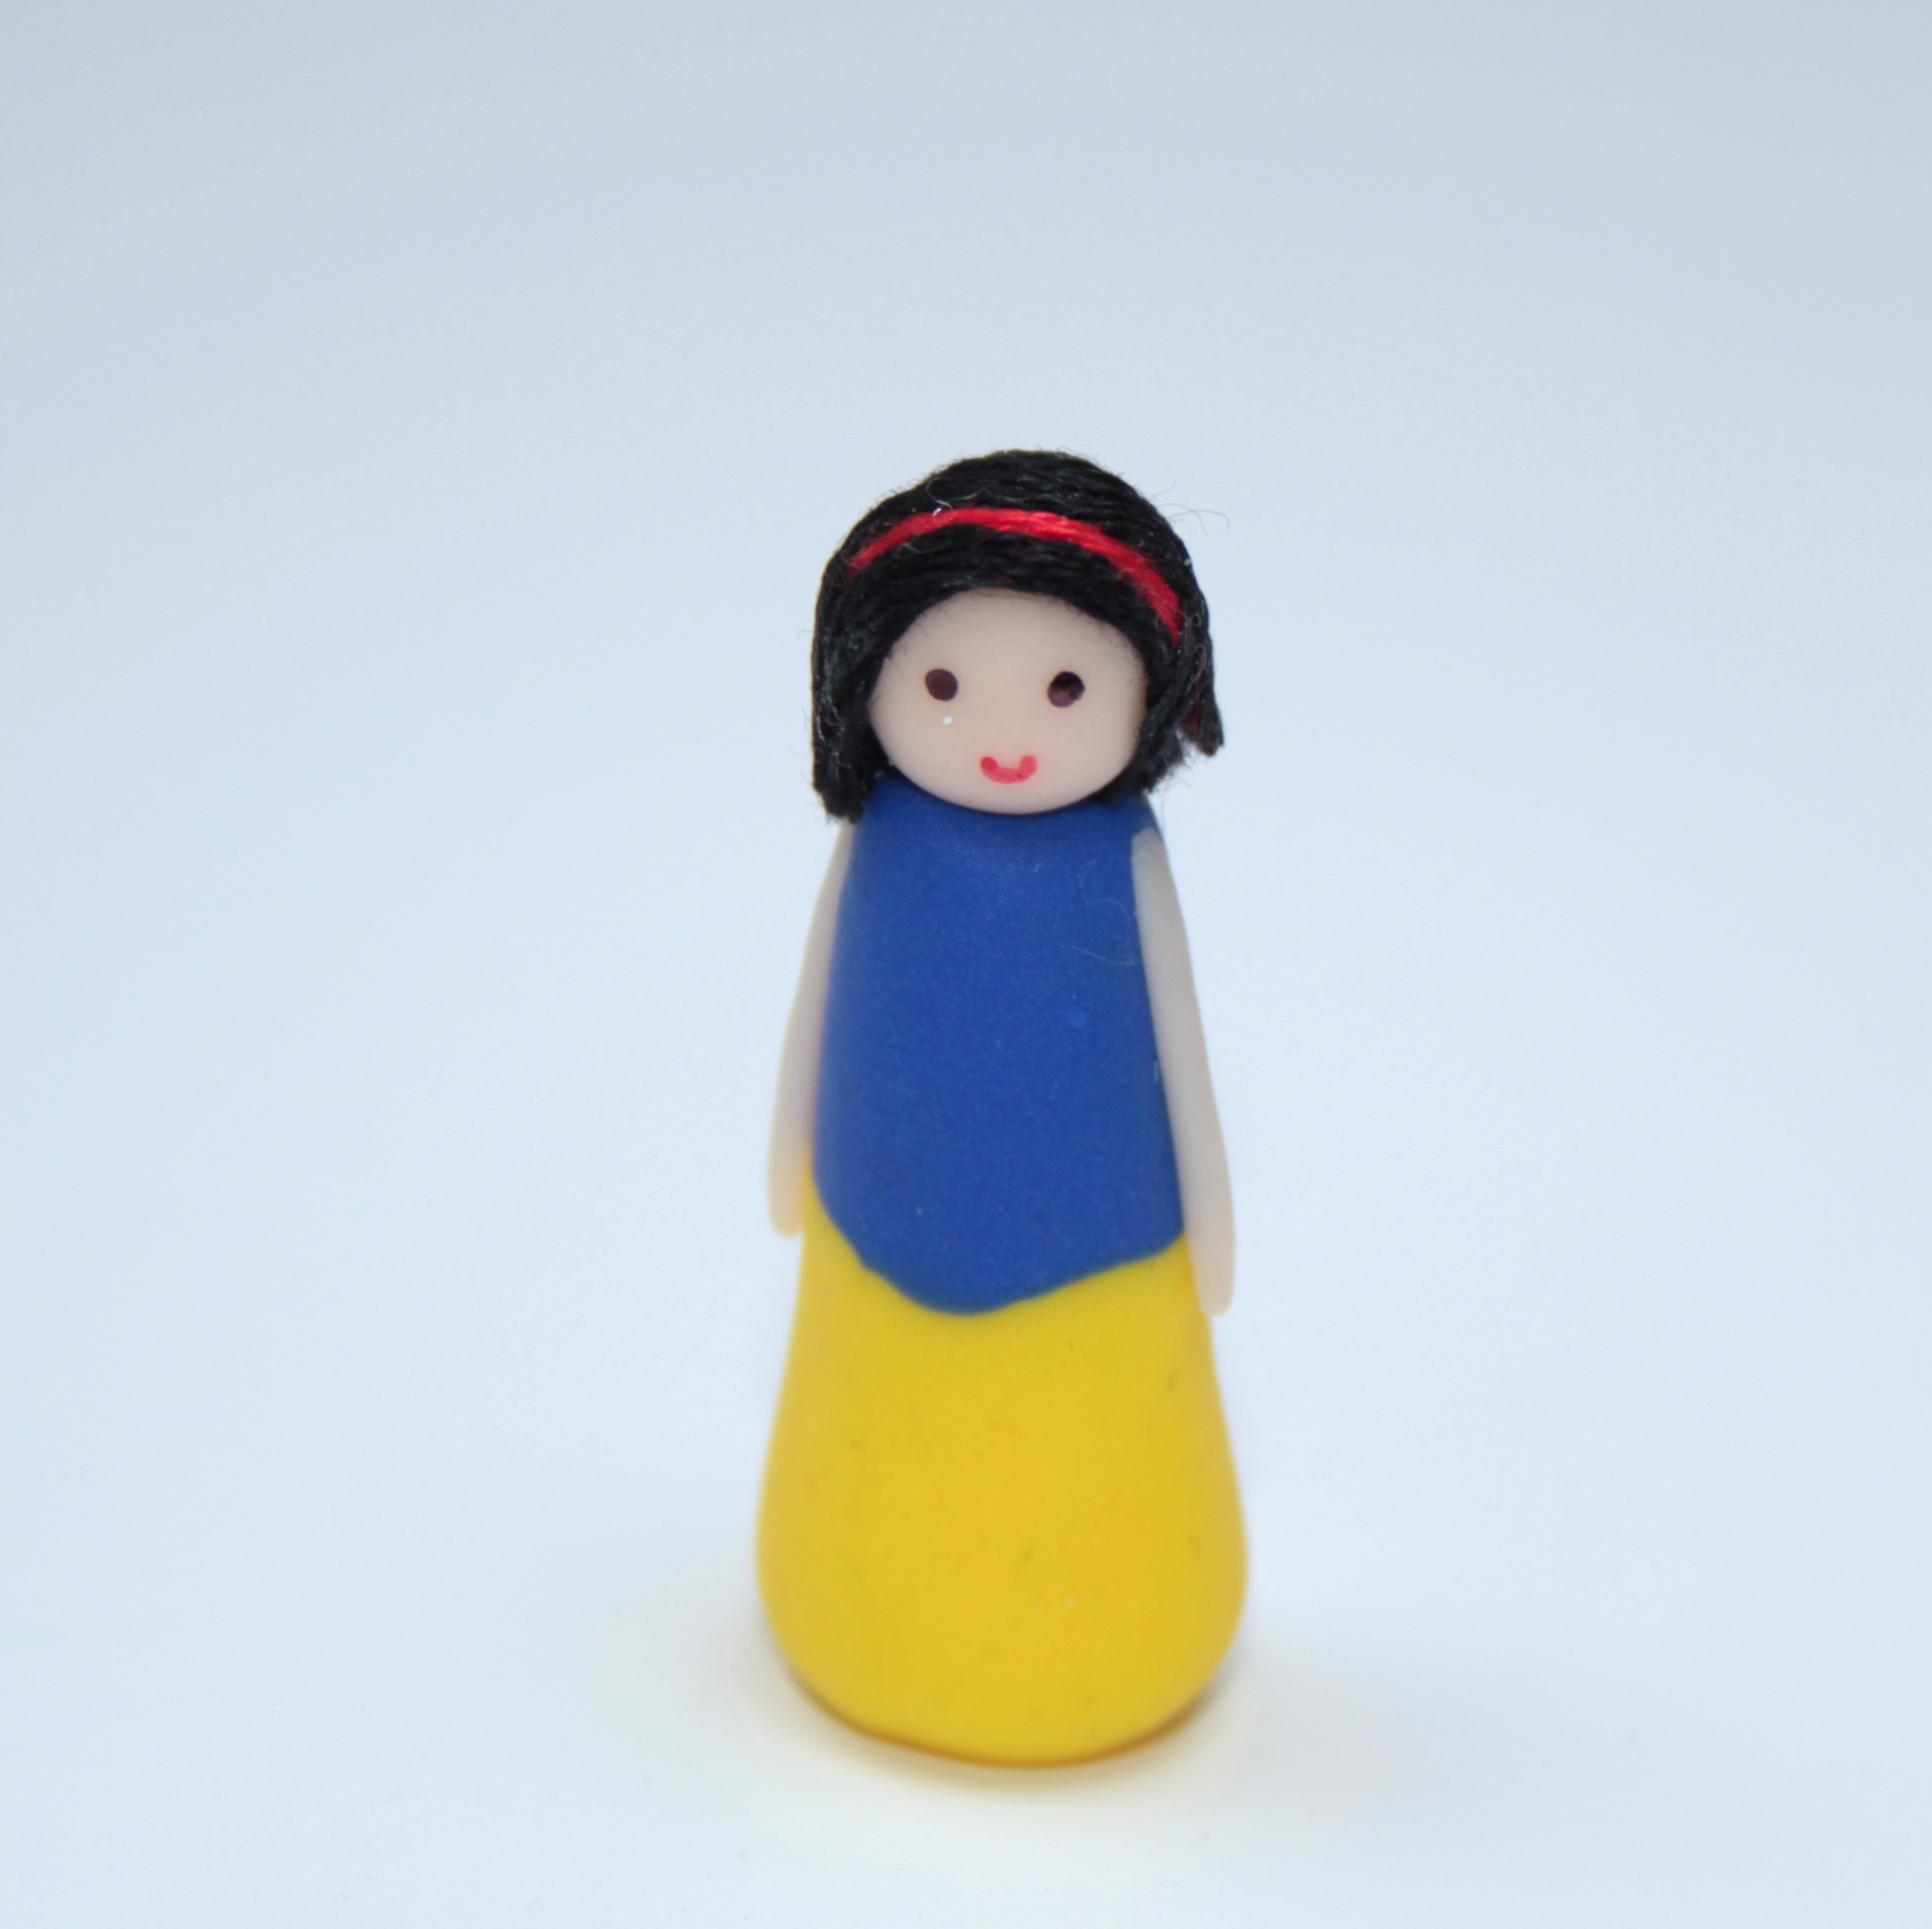
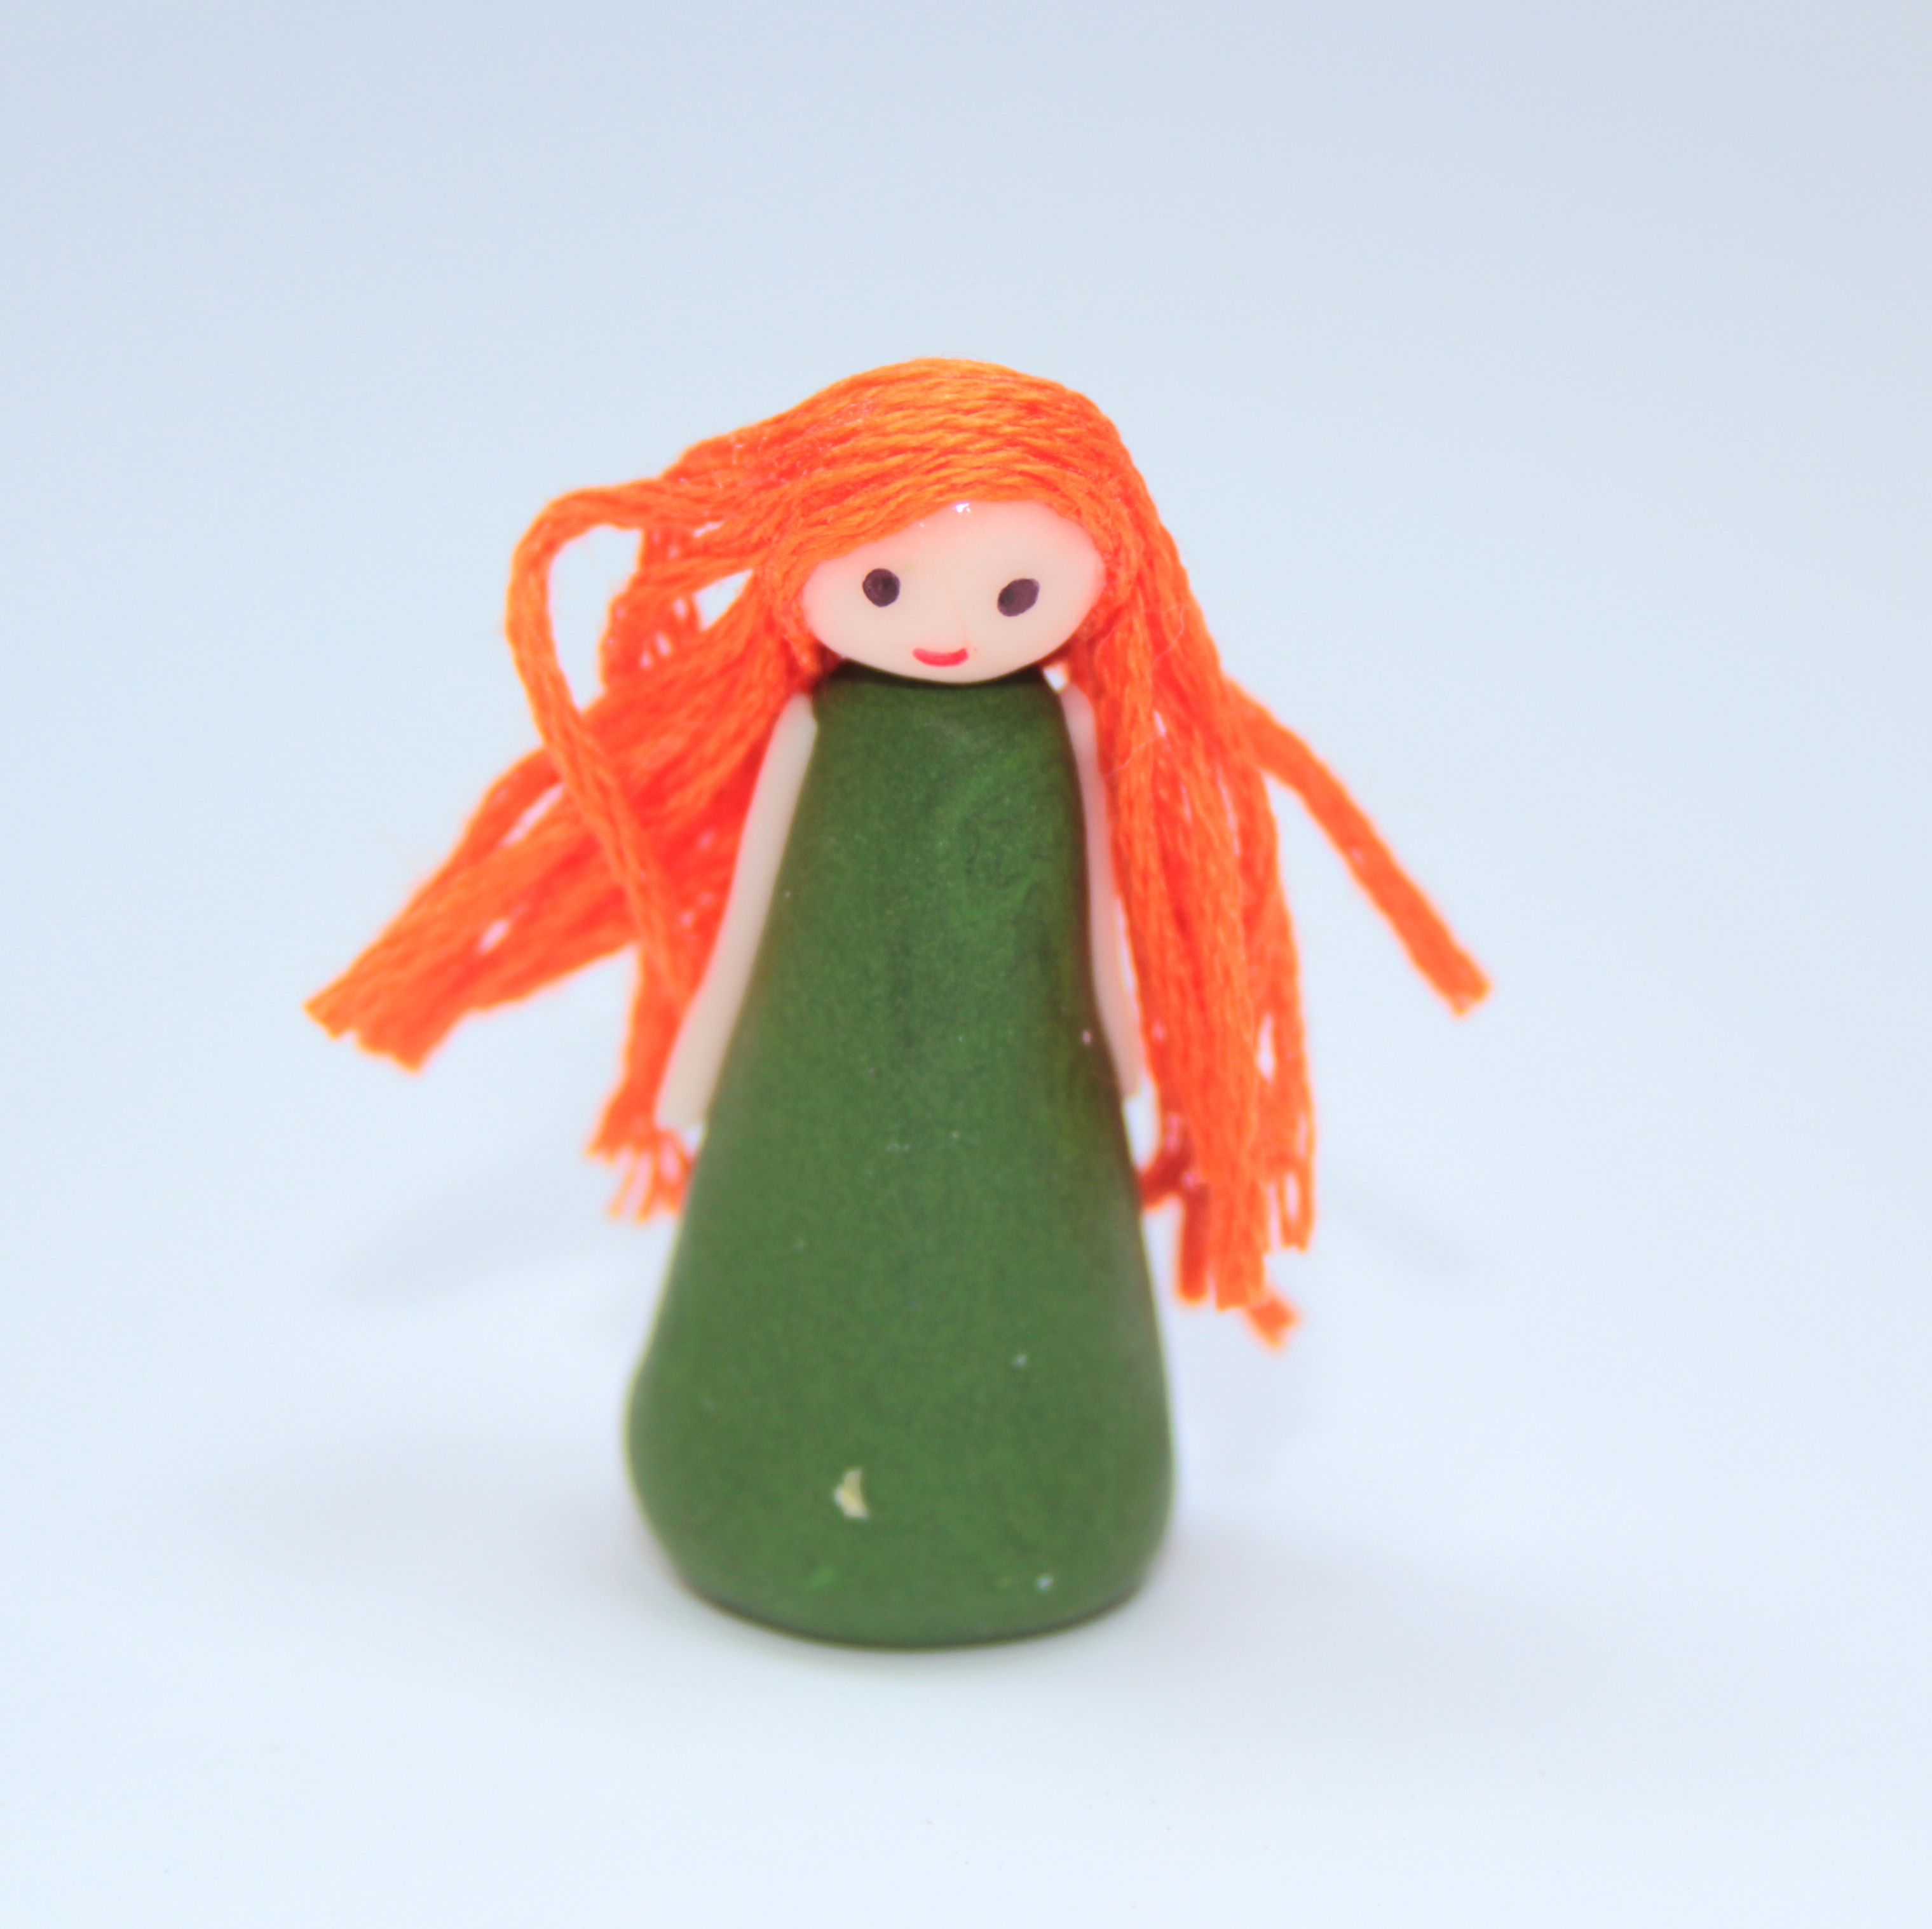
Here are the some of other dolls I made:

polymer princess little button diaries 10 polymer princess little button diaries 8polymer princess little button diaries 9 polymer princess little button diaries 12

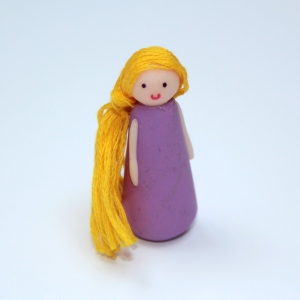
Can you work out who they are?! I liked the Anna princess best – I just added a cape and rolled it in place, put a bit of white thread in her hair and plaited it. Snow White’s body was made from two lumps of clay rolled together, with red thread for the hairband.

polymer princess little button diaries 11

Tia xx

PS. If you like our blog, we would love you forever if you could take a tiny two seconds to nominate us for the Best Craft Blog at the 2015 BIB awards… click below on the picture to vote. Scroll to section 12 on the form and select us. Thank you!

craft bibs 2015

x

The Final Few Days To Vote

craft bibs 2015

First up, we want to say thank you to everyone who has voted for us recently. We’re so lucky to have been shortlisted for the Brilliance in Blogging Awards later this year. We’re up against nine other great sites for Best Craft Blog. If you like what we do, we’d be so grateful if you could spare a teeny tiny two minutes to vote for us. All you need to do is click into the form, scroll down to section 12 and select us, Little Button Diaries. Voting closes Friday. Thank you once again!

 ~ Laura & Tia xx ~

How to Turn your Toddler into a Pirate

PIRATE CRAFTS

Arrrrrrrr! Coming up with costumes for parties can be tricky. We were invited to a pirate party at the weekend and instead of buying a costume I decided to make a few pirate accessories to transform my Little Button into a little scallywag. After grabbing a white top and black leggings from her wardrobe I added a length of stripy fabric around her middle, and made a felt parrot, cardboard telescope and duct tape pirate boots. For my Littlest Button I made some fabric parrot wings. Who’s a pretty boy then!

Felt Parrot

For this project you will need:

  • One sheet of felt in red, yellow & blue
  • Scrap pieces of felt in black & white
  •  Toy Stuffing
  • Glue and red thread

parrot templatepirate crafts
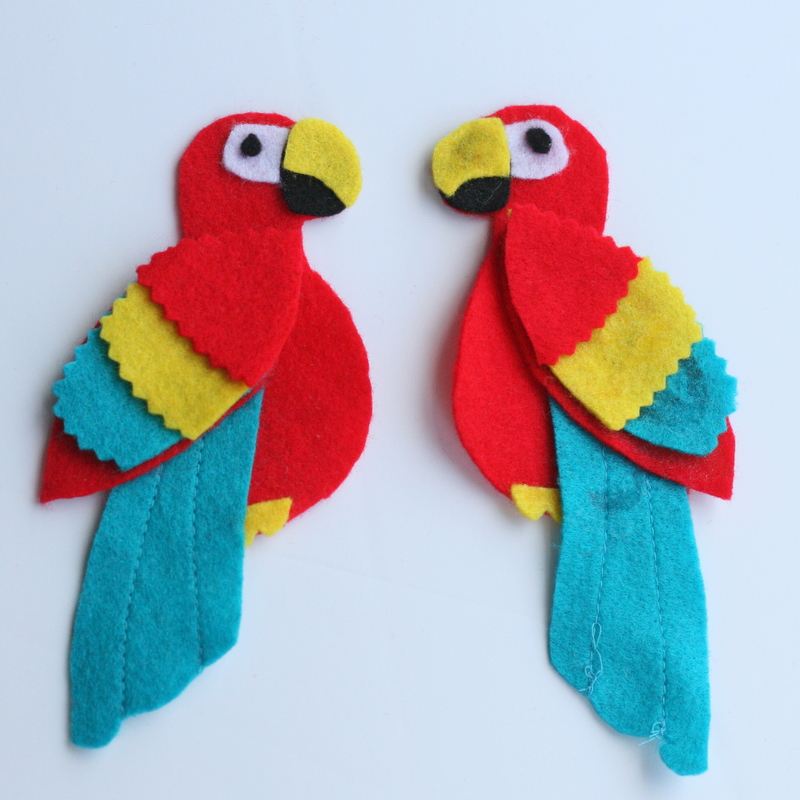
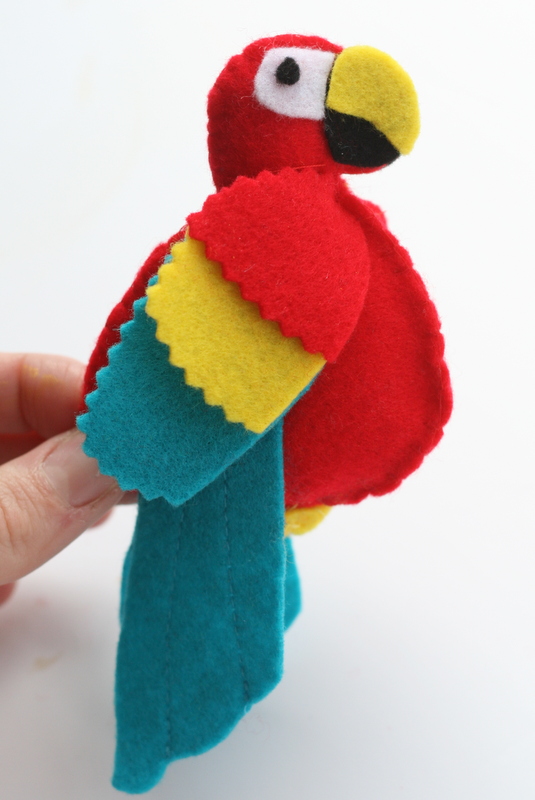
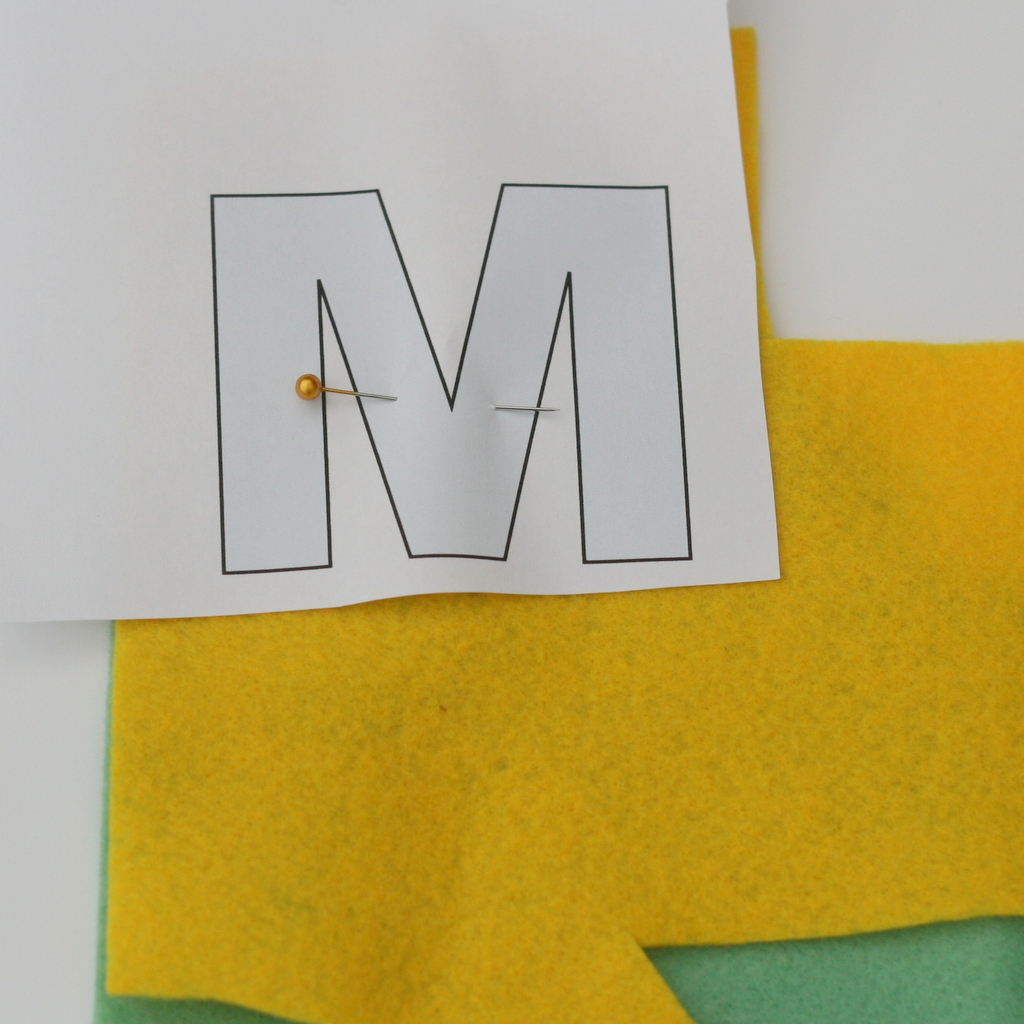
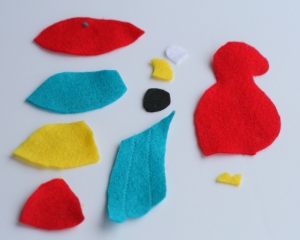
1. Begin by cutting out your pieces from the felt. You need two of each – one for each side of the parrot.
pirate crafts

2. To make the wings cut one in red as per the template. Then cut another in blue, one third smaller, and trim the bottom and side with pinking shears. Repeat with yellow and red pieces as per the picture. Stitch or glue together at the top.

pirate crafts3. Glue your parrots together so they are mirror images of each other.

 pirate crafts pirate crafts

4. Cut a belly piece (as above) and sew the two body pieces together using blanket stitch.

pirate craftspirate crafts

pirate crafts pirate crafts

5. Use a safety pin or a few stitches to attach to the shoulder of a piratey looking top.

Cardboard Telescope

For this project you will need:

  • Cardboard tube
  • Paper cup
  • Gold paint
  • Masking tape & doubled sided tape
  • Black and gold card
  •  Pirate stickers


pirate crafts pirate crafts

1. Draw around your cardboard tube on the base of your cup. Cut it out.

pirate crafts pirate crafts

2. Make centimetre-long snips around the bottom of the tube. Push the tube into the hole in the bottom of the cup. Bend back the snips and secure with masking tape.

pirate craftspirate crafts

3.Paint your telescope gold by applying several coats.

pirate crafts

4. Decorate with black and gold cards and pirate stickers.

Duct Tape Boots

 For this project you will need:

  • Welly boots
  • Black duct tape

pirate crafts pirate crafts

1. Very simply, wrap strips of duct tape around your wellies! This is a brilliant way of jazzing up boots as the tape can be removed without marking afterwards.

Finally, if you have a baby in need of a pirate-related costume then these parrot wings are simple to make (even though it can take a while to cut out all the wing pieces) and they are easy to sew. For our full tutorial click here.

pirate crafts

IMG_4138  pirate crafts

If you like our blog, we would love you forever if you could take a tiny two seconds to nominate us for the Best Craft Blog at the 2015 BIB awards… click below on the picture to vote. Scroll to section 12 on the form and select us. Thank you!

craft bibs 2015

 ~ Laura xx ~

Make a Toddler Booster Seat

booster chair tutorial little button diaries
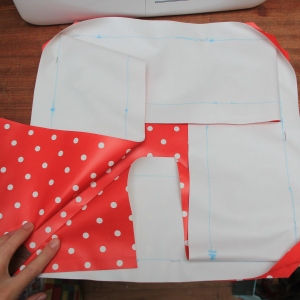
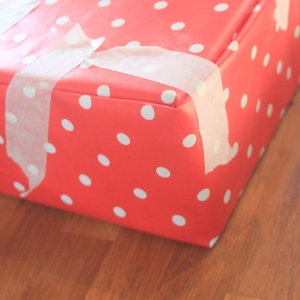
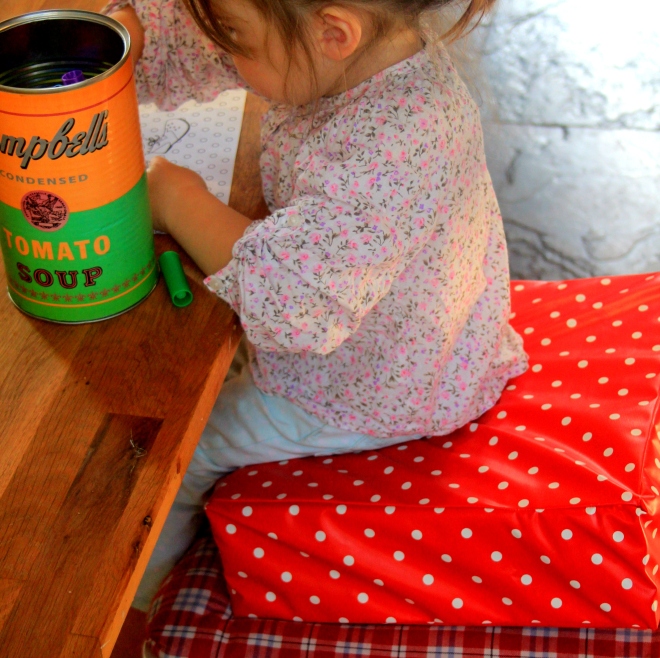
My little girl is in a sort of no-man’s land at the moment when it comes to sitting at the table. She’s too big for a high chair, but she’s too small for a chair. I thought about buying a booster chair – I haven’t seen any in the shops but I’m sure you can get them. Then I realised that all you really need is a bit of foam. And its easy to cover a bit of foam! You can buy upholstery foam from EBay, its really cheap and readily available. So that’s what I did. And here’s how I did it.
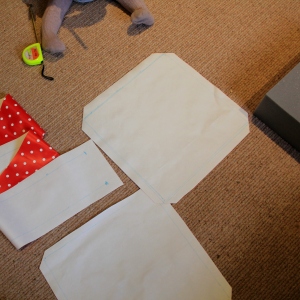
Materials:

  • 1 metre of oilcloth or PVC
  • Superglue
  • Upholstery foam cushion 12x12x5″

1. cut the fabric as follows:
2 x squares measuring 14 x 14″
1 x strip measuring 50 x 7″

2. Draw a 12×12 square in the centre of each large piece of fabric and a mark a strip 5″ wide on the length of fabric. This will show you where to pin and sew. Snip the corners off each square.

booster chair little button diaries 2

3. Fold over the end of each strip and sew.

booster chair little button diaries 4

4. Pin the strip along an edge of one of the squares, right sides together, matching up the pen lines.

booster chair little button diaries

5. Fold the strip around the corners to line up with the next edge and pin. Continue all the way around. Snip off the edges on the stip to match up with the square.

 booster chair little button diaries 3 booster chair little button diaries 7

6. Sew all the way along this line (including over the ends of the strip)

booster chair little button diaries 11 booster chair little button diaries 9

 Place the foam cushion inside the fabric and put the remaining fabric square on top. Fold  and tuck the edges in. Glue in place (or you could sew it, but strong glue works well on oilcloth and getting the foam in a small hole would be a challenge…) and place masking tape over the fabric to hold the glue tightly in place.

booster chair little button diaries 12 booster chair little button diaries 13

Hoorah! Thats a happy little raised up bottom. One thing I would note though, if I was to do it again, is that it would be better with ties on, as it does slip off the chair a bit.

booster chair little button diaries 14b

booster chair little button diaries 17      booster chair little button diaries 15

If you like our blog, we would love you forever if you could take a tiny two seconds to nominate us for the Best Craft Blog at the 2015 BIB awards… click below to vote. Scroll to section 12 and select us. Thank you!

craft bibs 2015

Tia x


Cupcake Piñata

Cupcake piñata DIYHooray, our latest project for Hobbycraft is now live on their blog! It’s a whacking big piñata cupcake. Perfect for an outdoor celebration. To see the full tutorial of how to make it visit the Hobbycraft blog.

Kids cupcake piñata hobbycraft

craft bibs 2015We’re really lucky to have been shortlisted for a craft award for the Bibs2015 awards. If you two minutes spare, please can you vote us for Best Craft Blog (section 12 of the form). Thank you so much!

~ Laura & Tia xx ~

Brilliance in Blogging Awards 2015

thank you photo

We were very very happy to learn this week that Little Button Diaries have made the shortlist for the Bibs. The Brilliance in Blogging Awards, are the bees knees of blogging awards so we’re obviously very excited (and still in shock!) at making the shortlist.

We’re up against nine other great blogs for Best Craft Blog. If you like our blog, we’d be so grateful if you could spare a teeny tiny two minutes to vote for us. All you need  to do is click into the form, scrolling down to section 12 to select us, Little Button Diaries.

craft bibs 2015

Thank you so much for reading our blog and for all your lovely support.

~ Laura & Tia xx ~


Felt Scrap Alphabet and Drawstring Bag

bag alphabet and drawstring bag DIY

I have a tremendous amount of scrap bits of felt and fabric that lie in a box waiting to be used. After having a Spring clean I decided to use up my scrap felt to make an alphabet for my Little Button, along with its own fabric bag.

To make the alphabet you will need:

  • Enough scrap felt to make 52 letters
  • White thread
  • Pins

To make the bag you will need:

  • Scrap fabric measuring 16 inches x 12 inches
  • 30 inches cotton tape
  • Safety pin

1. Begin by deciding what size and font you want your letters to be, and printing them out. My letters measured 3 inches high. I used Arial bold font in Microsoft Word and printed out a template.

felt alphabet diy

2. Next, pin each letter onto two pieces of felt and cut them out.

felt alphabet diy

3. Pin them together and sew. Trim the excess threads and neaten up the edges.

felt alphabet and drawstring bag tutorial

4. To make the bag you will need 2 pieces of fabric cut to 8 inches x 12 inches. Begin by placing your fabric right sides together.

felt alphabet and drawstring bag tutorial

5. Sew the fabric together. Begin down one side starting 2 ½ inches from the top. Sew and backstitch at the start and sew down one side, along the bottom and up the other side, stopping 2 ½ inches from the top on the other side. Backstitch to secure.

felt alphabet and drawstring bag tutorial

6. To make the drawstring part, iron your seam closed and sew. Repeat on the other side.

 felt alphabet and drawstring bag tutorial felt alphabet and drawstring bag tutorial

7. Next, fold the top over twice making sure the tie can easily fit through. Sew along the bottom of this section to secure it in place. Repeat on the other side of the bag.

 felt alphabet and drawstring bag tutorial felt alphabet and drawstring bag tutorial

8. Using a safety pin, thread the cotton tape through the top and secure with a knot.

This project was as easy as…well A-B-C! The bag is also perfect for storing a few toys in.

felt alphabet and drawstring bag tutorialfelt alphabet and drawstring bag tutorial

If you like our blog, we would love you forever if you could take a tiny two seconds to nominate us for the Best Craft Blog at the 2015 BIB awards… click below to vote. Scroll to section 12 and select us. Thank you!

craft bibs 2015

 ~ Laura xx ~