A BIG Thank You

little button diaries little button diaries

Yesterday we found out that our blog has become a finalist in the Brilliance in Blogging Awards (BIBs) for Best Craft Blog. When we found out via twitter, we did a wiggly, jiggly dance and texted each other with a OMG!!!!!! We are so grateful to everyone who voted for us to get this far, anyone who comments on our posts and for turning up in the first place and reading our blog – we wouldn’t be here without you (we’d like to give you all a big hug). We’re up against so really fantastic crafts blogs and feel very privileged to be among them. Click here to have a look at the finalists.

 And, erm… if you feel like voting again (you know you want to!) then nominations for the Best Craft Blog in the MADs (Mum and Dad Awards) are still open. We’d love to make this year a double whammy and reach the finals. All you need to do is click on the picture, enter a blog of the year then select us for Best Craft Blog. 

MADS_BADGE_EXAMPLE_NOMINATED.fw_

 Thanks again, we’re still pinching ourselves.

 ~ Laura & Tia xx ~

The Final Few Days To Vote

craft bibs 2015

First up, we want to say thank you to everyone who has voted for us recently. We’re so lucky to have been shortlisted for the Brilliance in Blogging Awards later this year. We’re up against nine other great sites for Best Craft Blog. If you like what we do, we’d be so grateful if you could spare a teeny tiny two minutes to vote for us. All you need to do is click into the form, scroll down to section 12 and select us, Little Button Diaries. Voting closes Friday. Thank you once again!

 ~ Laura & Tia xx ~

Tots100 ‘Vlog School’

tots100 vlog school

We were asked by Tots100 to be a part of their new series called ‘Vlog School’ because we recently started vlogging when we documented our MAD Blog Award Weekend.

As newbie vloggers we made a little video about what we’ve learnt so far and why we took the plunge and hit the record button.

(This was our first time speaking to camera, so be gentle with us!)

For other tips and tricks from vloggers, hop on over to Tots100.

~ Laura & Tia xx ~

Peek-a-Boo Wooden Puzzle

peek a boo wooden puzzle

peek a boo woodden puzzle diy

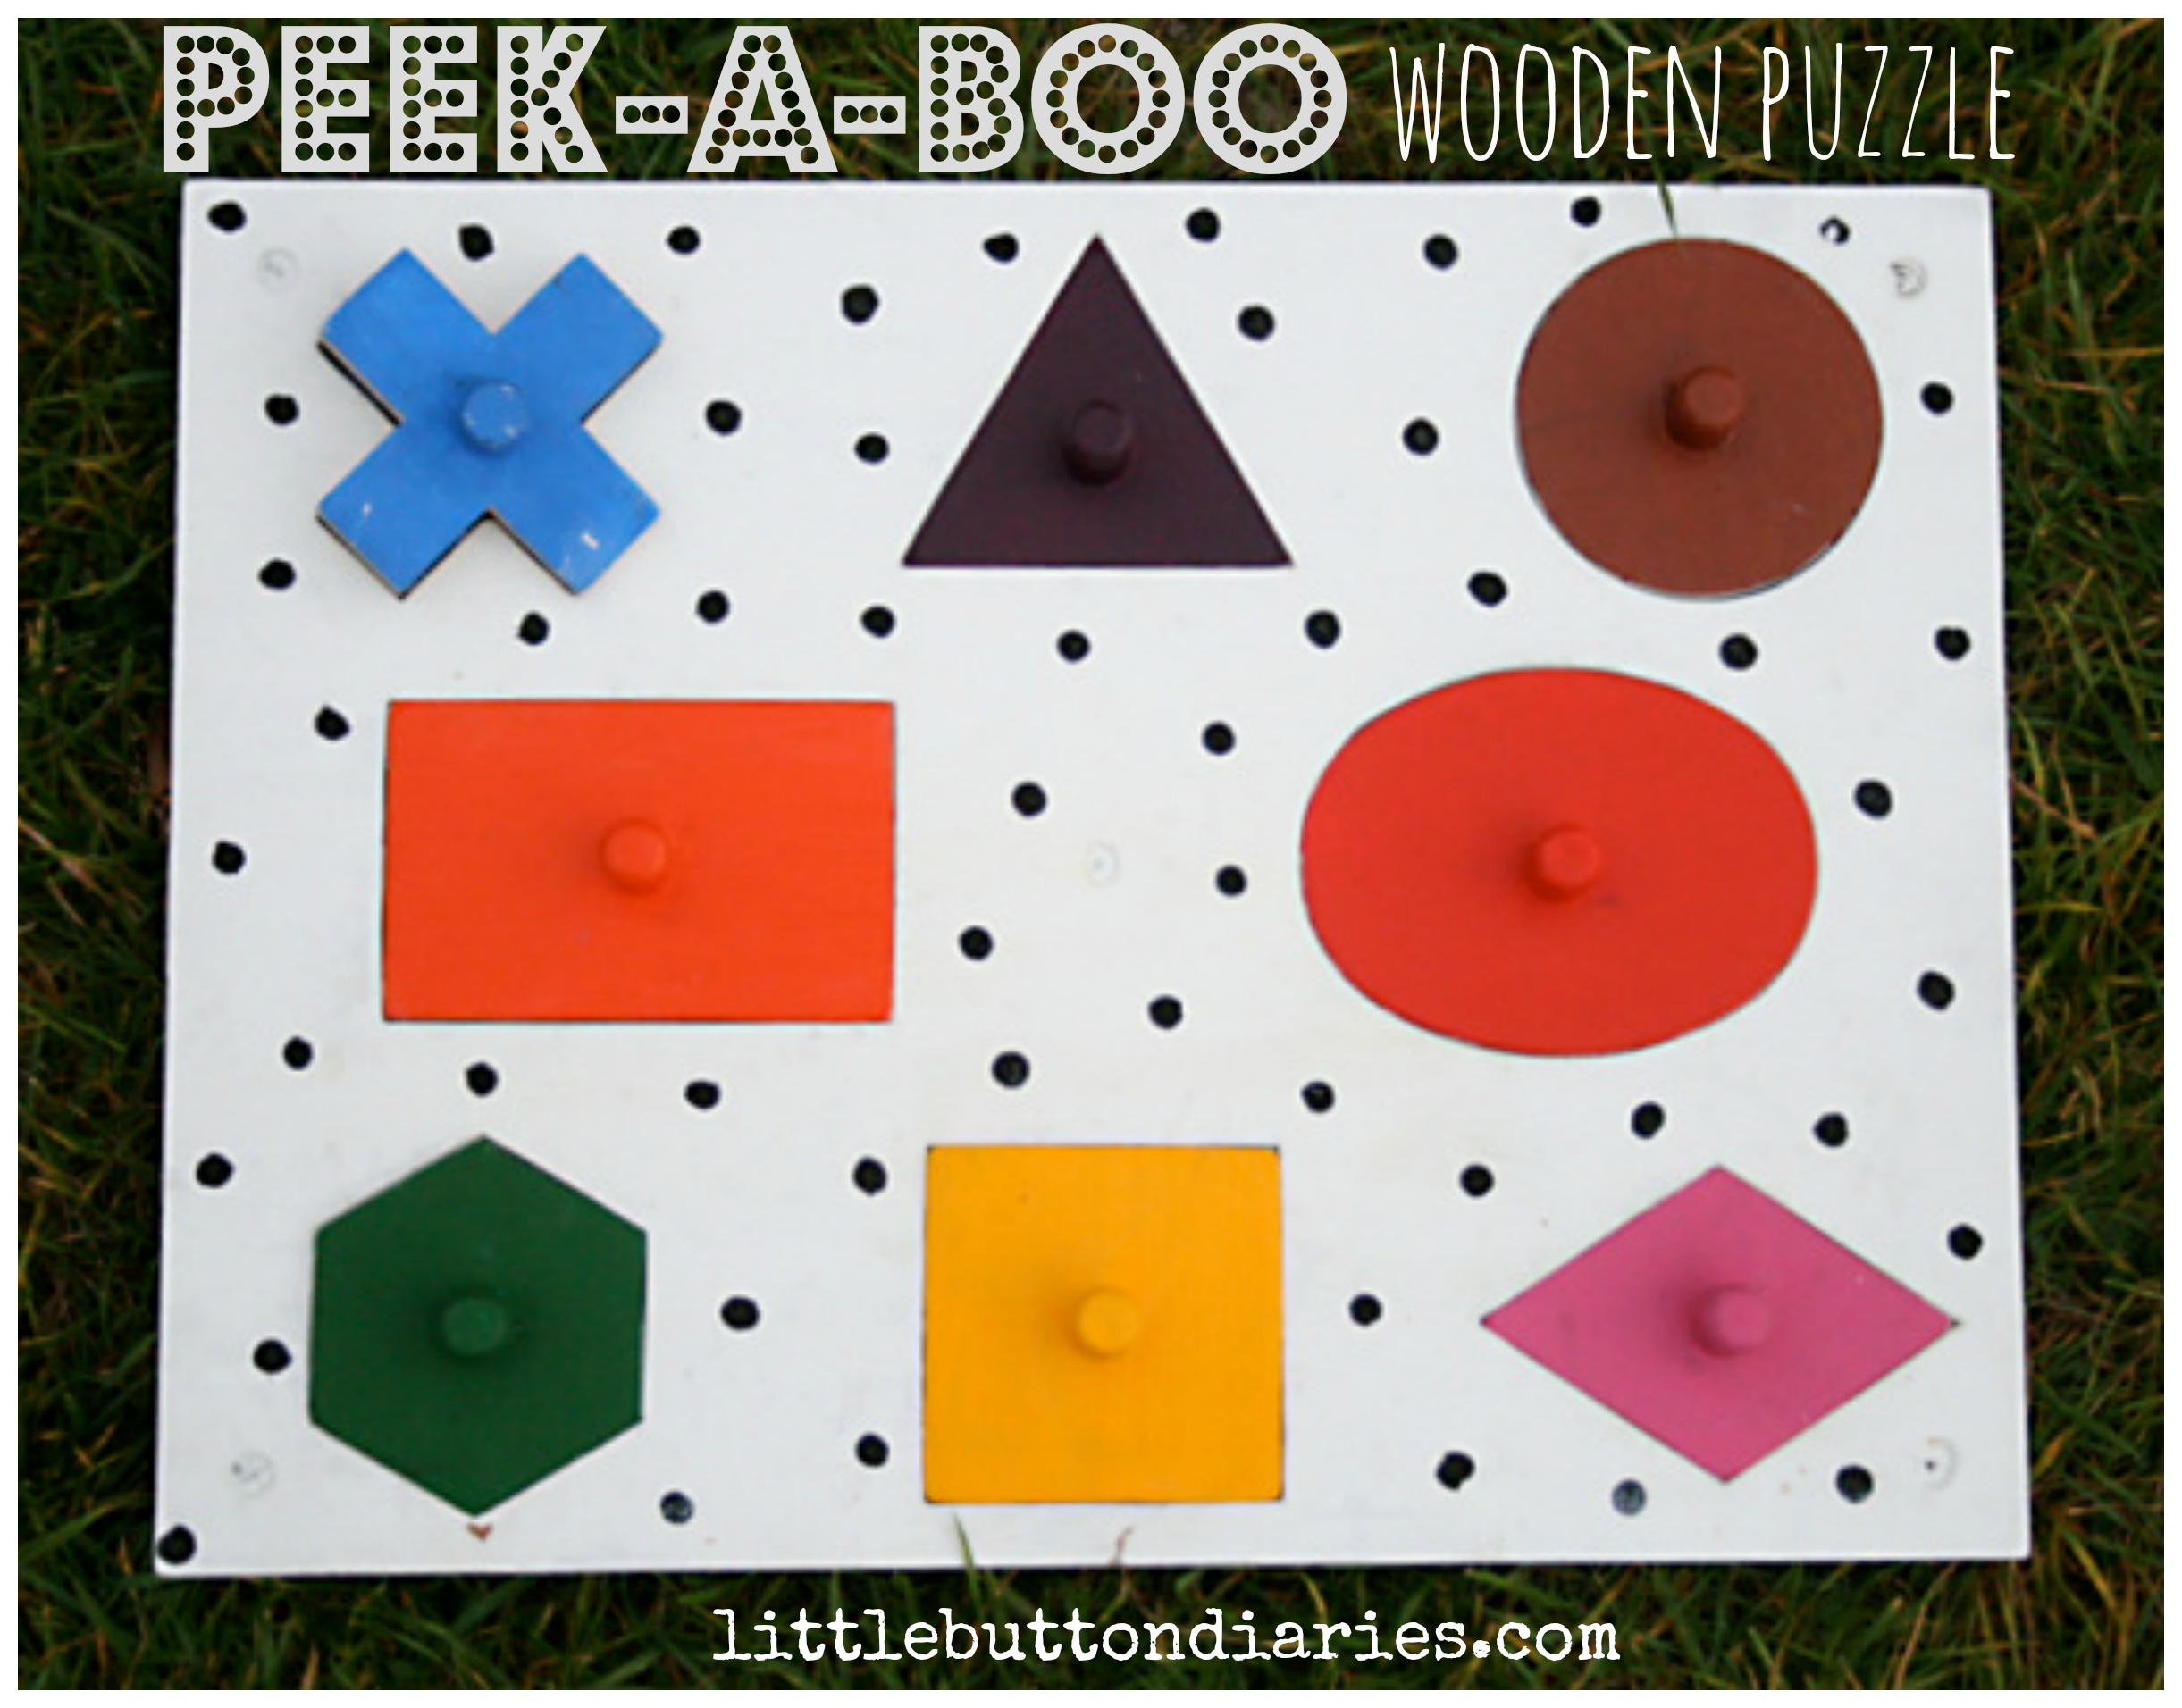
My Little Button is at an age where wooden puzzles have suddenly become fascinating to her. Her Grandpa and I simultaneously came up with a craft project idea based on her new-found love, to create a customised ‘peek-a-boo’ family puzzle. Grandpa did the hard work of constructing the puzzle, and I added the decoration – so the instructions below are a team effort!

wooden puzzle diy wooden puzzle diy

For this project you will need:

  • Sheet of 400mm x 300mm x 18mm thick MDF
  • MDF sealer and primer
  • 3mm plywood for backing
  • 5 x 4mm Interscrews
  • Foam protector sheet cut to size of backing
  • Photographs of family members
  • Wood paint in white
  • Acrylic paints in black and eight colours of your choice (I used red, pink, purple, brown, yellow, orange, green & blue)
  • Double-sided sticky tape

wooden puzzle DIY Little Button Diaries

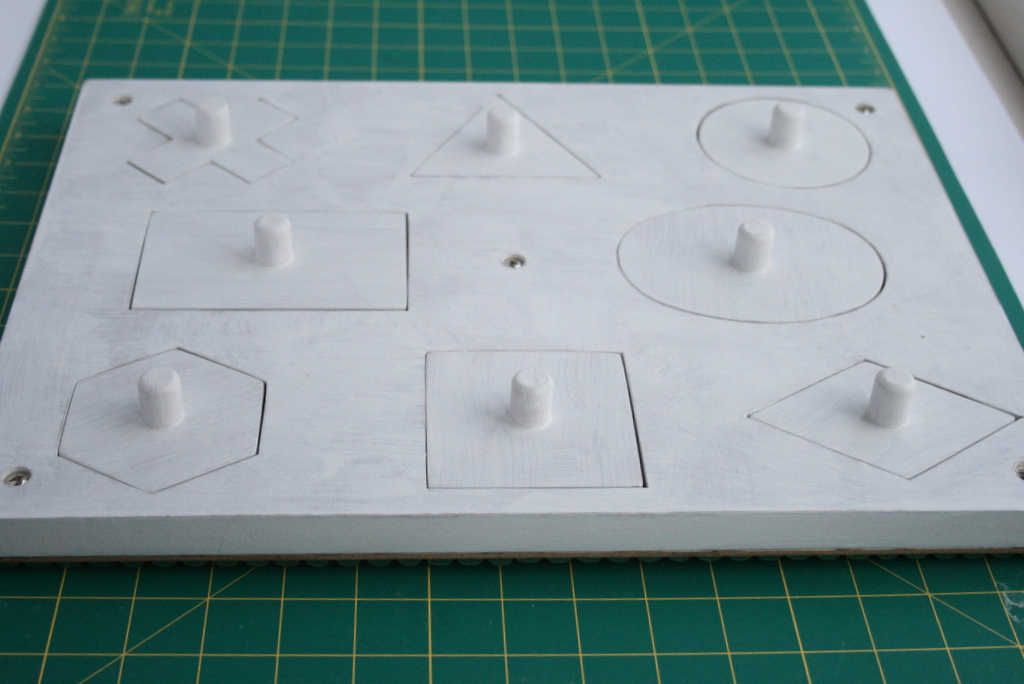
1. First design the layout of the puzzle by drawing a selection of geometric shapes onto paper. Most of these were straightforward but I used this link to help me form an oval. When you are happy with the plan, fix the paper to a sheet of MDF, then cut out the shapes using a scroll-saw.

wooden puzzle diy little button diaries

2. Begin by drilling small pilot holes in each of the shapes and threading the narrow saw blade through. I was able to cut out the puzzle pieces leaving the holes, which would become their matching “homes”. I had to be very accurate as the shapes would have to fit the holes in each orientation – the sides and angles of each polygon for example had to be exactly the same on all faces.

wooden puzzle diy

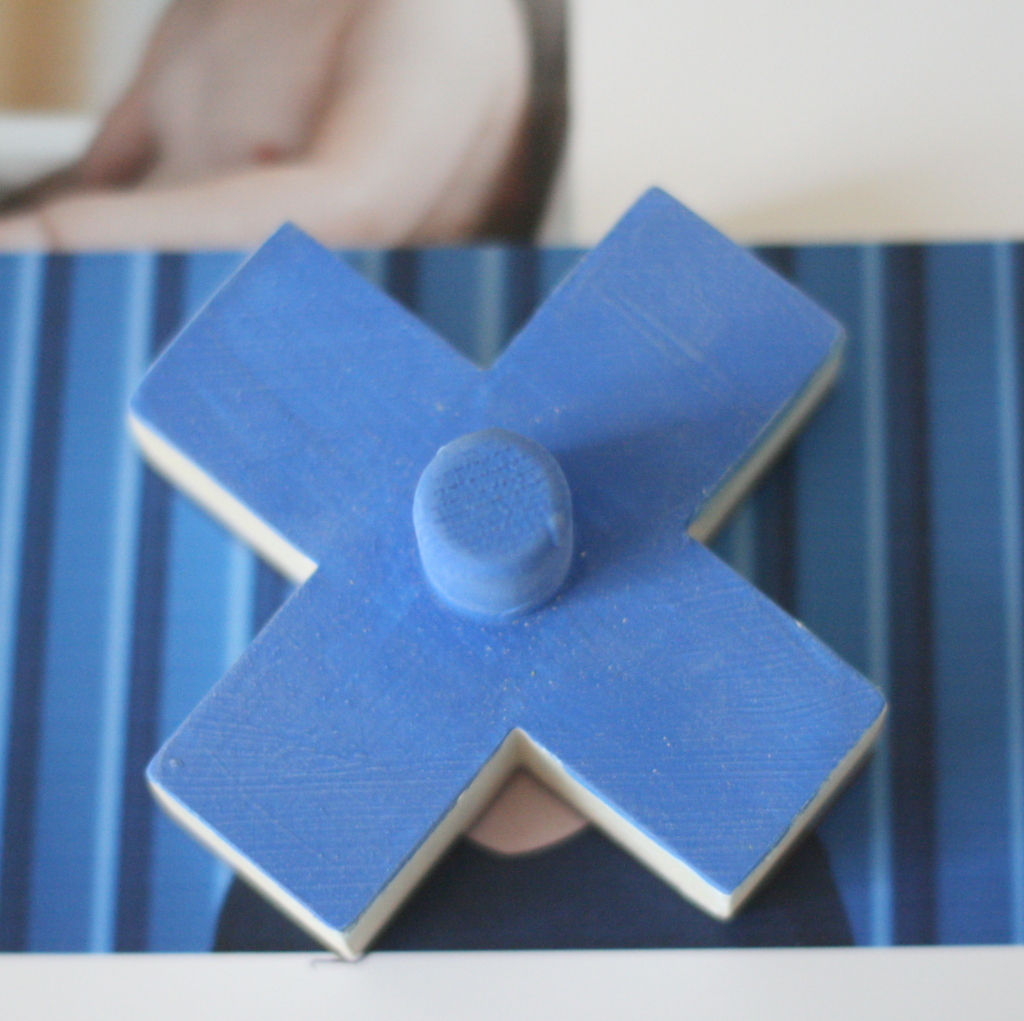
3. Next drill a 9mm hole in the centre of each piece. In these holes fit and glue a length of dowel to act as a handle. Make sure the dowel is a tight fit, which little fingers would not be able to remove!

wooden puzzle diy

4. Add a coat of MDF sealer and one of primer to the board so it is ready for decoration. Then cut a piece of 3mm plywood to form a back panel … otherwise the shapes would just fall through.

wooden puzzle diy

5. To attach the backing I’ve used 5 x 4mm Interscrews. This allows the back to be removed and the pictures updated as and when. Finally, attach some foam protector sheet to avoid scratching the furniture.

IMG_8955

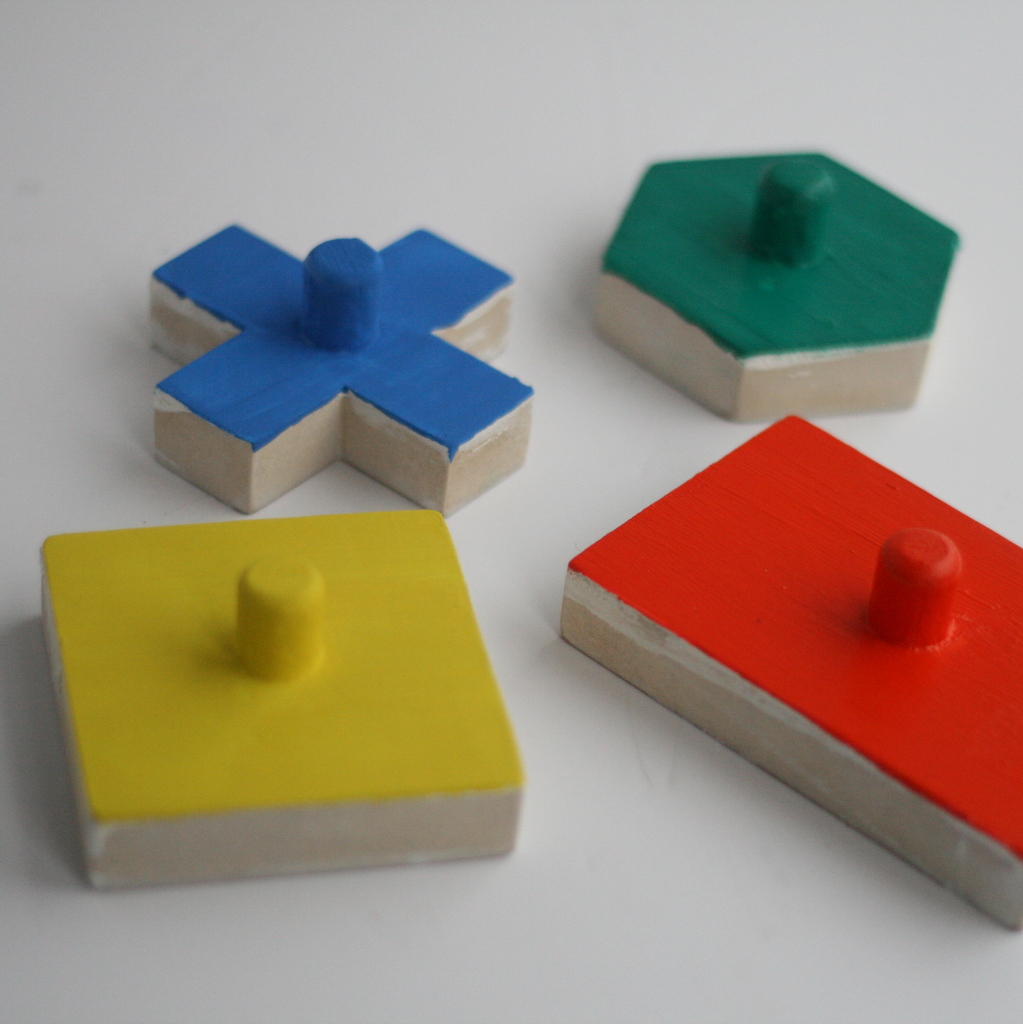
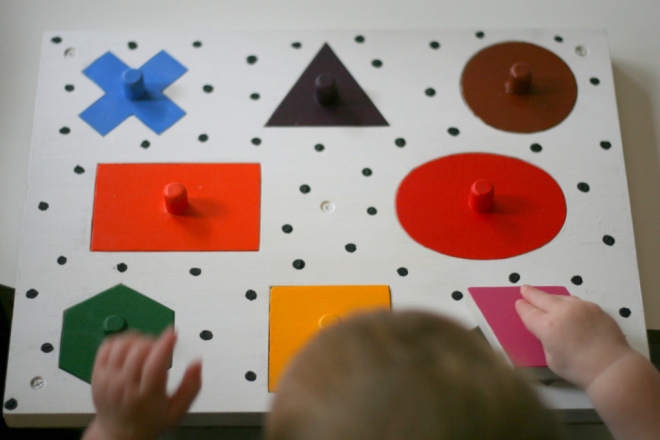
6. To decorate, take the shapes out and paint the whole board with white wood paint. Then paint the top of each shape with a different coloured acrylic paint. I decided to not paint the sides so they could still easily slot into the base. If you find the pieces are too snug in their holes, you can use sandpaper to smooth the edges.

 wooden puzzle DIY wooden puzzle DIY

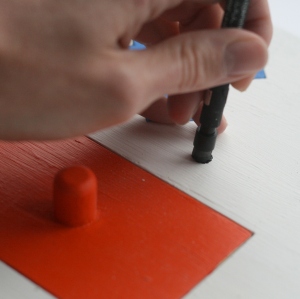
7. To create the black dots on the puzzle board you need a pencil with a rubber on the end and black acrylic paint. Dip the pencil into the paint and stamp it onto the board. Fill in any gaps in the dots with a fine paintbrush. It’s a really easy and effective way to print.

wooden puzzle diy

8. Measure the size of each shape and print out a photo of your nearest and dearest – one for each shape. You want to be able to see as much of each face as possible when you lift your shapes.

wooden puzzle diy wooden puzzle diy

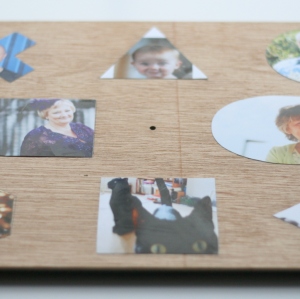
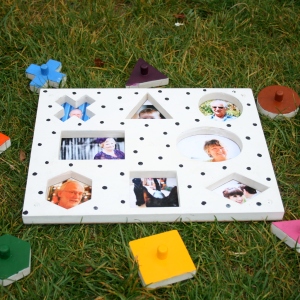
9. Unscrew the back of the puzzle. Using double-sided sticky tape, attach the photos to the back board, positioning them under each space. The nice thing about this puzzle is you can change the pictures as often as you like. Changing the order will keep your Little Buttons on their tiny toes, and adding in new people is another challenge for them.

wooden puzzle diy

10. Screw the puzzle back together and get playing.

wooden puzzle diy

I’m so pleased with the reaction from my Little Button with this project. She actually squealed when she realised there was ‘Dada’ under one of the shapes. The puzzle is great as she can learn her family members, shapes and basic colours at the same time.

wooden puzzle DIY

~ Laura (& Grandpa Alf) xx ~

NB – Obviously with anything involving proper paint, sawing and big shed skills, make sure you keep your Little Buttons well out of the way. This project produced a lot of dust when we constructed the puzzle so it’s best for little ones to steer clear.

A New Look for a Mid-Pregnancy Mum

new look maternity clothes review

It seems that I am having to dig out my maternity wear a lot sooner this time around as my bump is rapidly expanding. As I didn’t have any summer maternity wear last time around New Look were kind enough to send me some pieces from their current range.

I chose a tea dress, as I wear a lot of them normally, and a pregnancy staple – a pair of over-the-bump jeans. I also chose something I wouldn’t normally wear – a kimono – as it seems everyone but me is wearing one right now!

Of all the items, the Navy Broderie Panel Tea Dress (pictured above) was my favourite. The fabric is very soft and the cut of the dress sits nicely on my curves – it managed to feel floaty and light, without making me feel like I was wearing a tent. The dress costs £22.99 and is also available in white.

new look maternity range review

The jeans were comfy and had good stretch for the bump but – like many pairs of jeans I’ve had before – they tended to lose a little of their shape between washes. They were still the best ones I have tried though. New Look do a variety of different styles and types of denim and their range is well worth a look. The faded jeans I chose cost £22.99.
The kimono offered me a welcome break from simply slinging on a cardigan, and definitely made me feel a lot more chic – even when I teamed it with jeans, ballet pumps and a plain top. You don’t necessarily need a maternity version, but I found that having a bit of extra room works well with this style of cover-up. It also made me feel a tiny bit fashionable, something which has previously escaped me in pregnancy! It is currently in the sale, priced at £16.09.
~ Laura xx ~