Make a Toddler Booster Seat

booster chair tutorial little button diariesMy little girl is in a sort of no-man’s land at the moment when it comes to sitting at the table. She’s too big for a high chair, but she’s too small for a chair. I thought about buying a booster chair – I haven’t seen any in the shops but I’m sure you can get them. Then I realised that all you really need is a bit of foam. And its easy to cover a bit of foam! You can buy upholstery foam from EBay, its really cheap and readily available. So that’s what I did. And here’s how I did it.

Materials:

  • 1 metre of oilcloth or PVC
  • Superglue
  • Upholstery foam cushion 12x12x5″

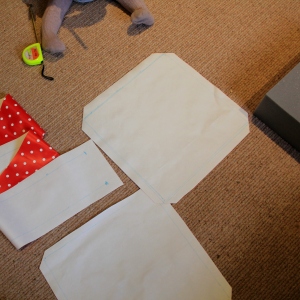
1. cut the fabric as follows:
2 x squares measuring 14 x 14″
1 x strip measuring 50 x 7″

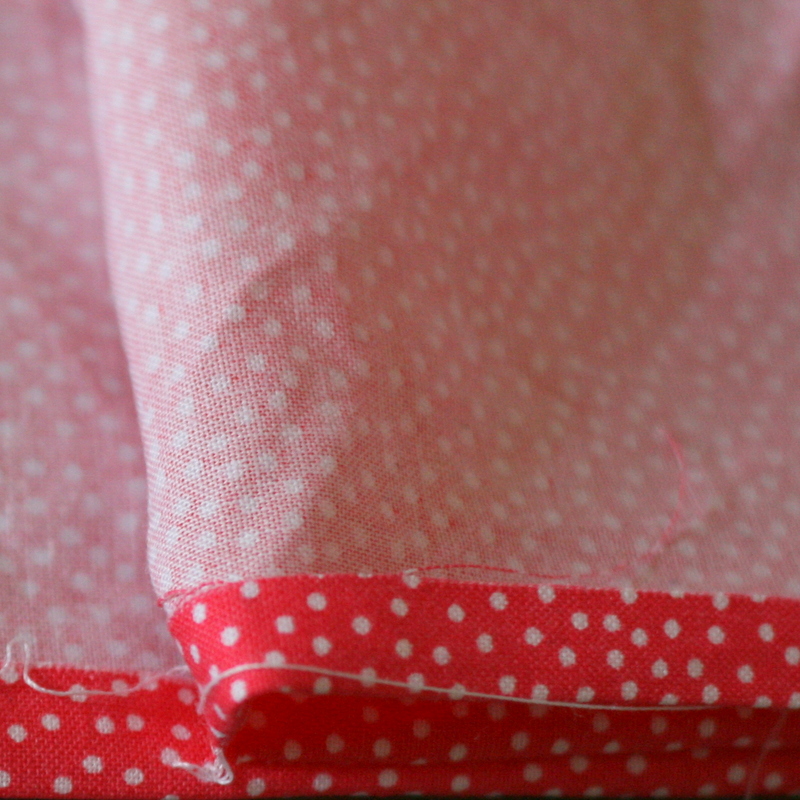
2. Draw a 12×12 square in the centre of each large piece of fabric and a mark a strip 5″ wide on the length of fabric. This will show you where to pin and sew. Snip the corners off each square.

booster chair little button diaries 2

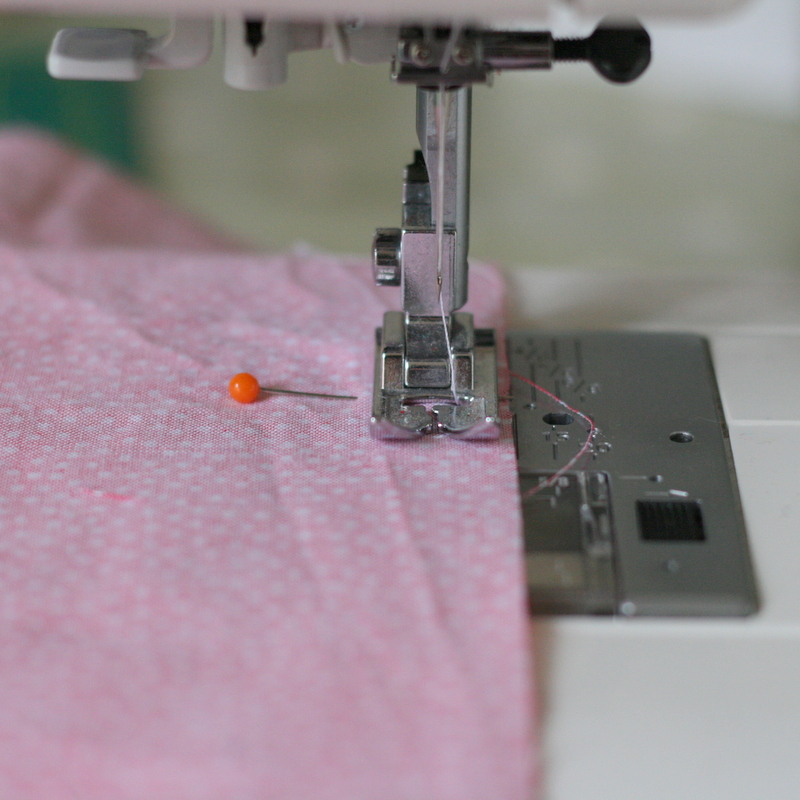
3. Fold over the end of each strip and sew.

booster chair little button diaries 4

4. Pin the strip along an edge of one of the squares, right sides together, matching up the pen lines.

booster chair little button diaries

5. Fold the strip around the corners to line up with the next edge and pin. Continue all the way around. Snip off the edges on the stip to match up with the square.

 booster chair little button diaries 3 booster chair little button diaries 7

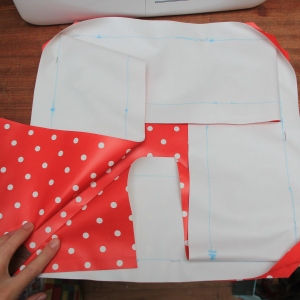
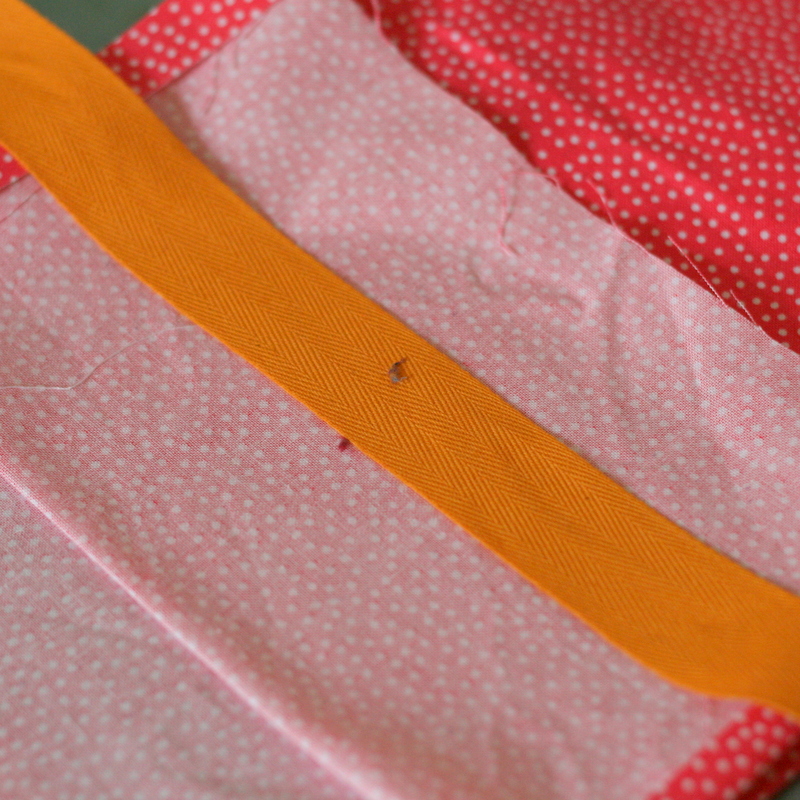
6. Sew all the way along this line (including over the ends of the strip)

booster chair little button diaries 11 booster chair little button diaries 9

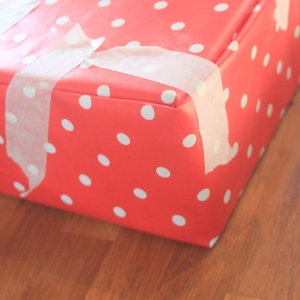
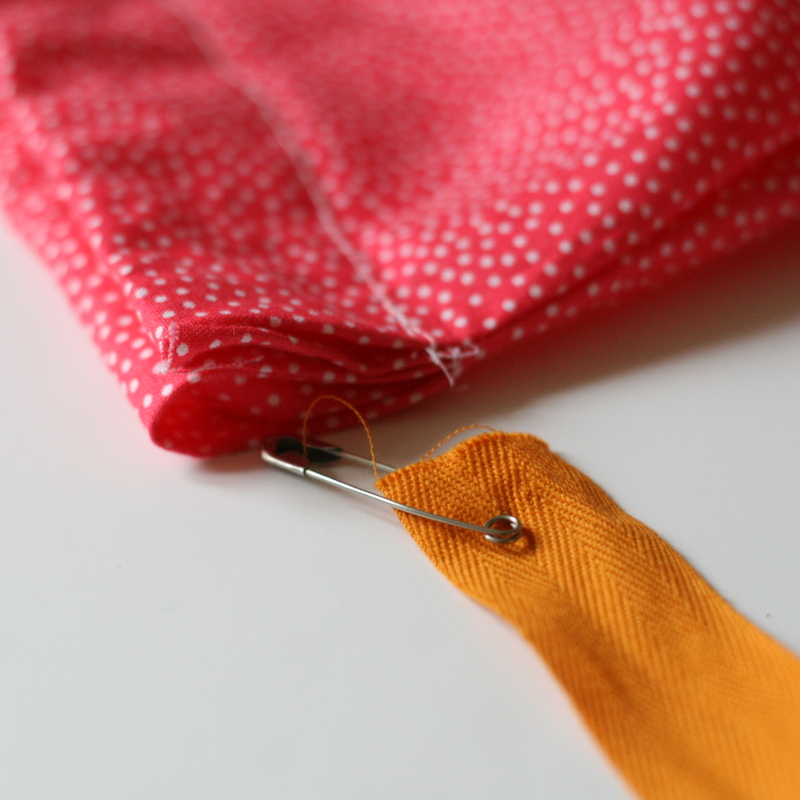
 Place the foam cushion inside the fabric and put the remaining fabric square on top. Fold  and tuck the edges in. Glue in place (or you could sew it, but strong glue works well on oilcloth and getting the foam in a small hole would be a challenge…) and place masking tape over the fabric to hold the glue tightly in place.

booster chair little button diaries 12 booster chair little button diaries 13

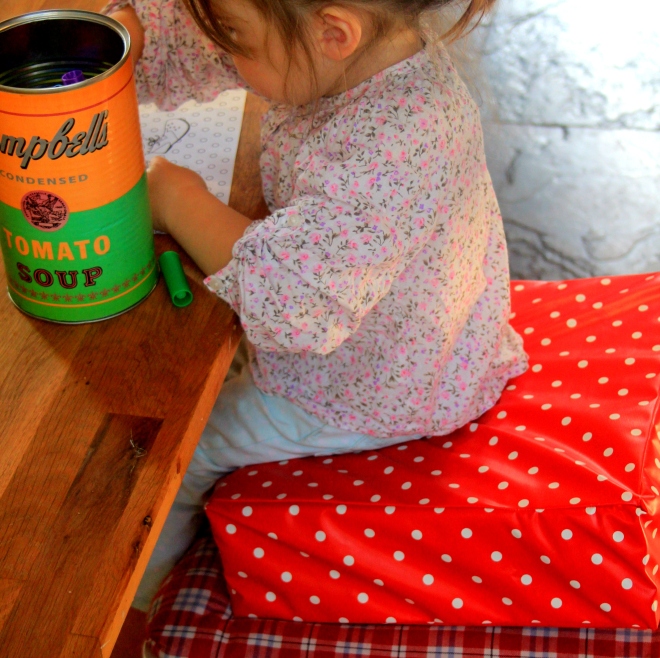
Hoorah! Thats a happy little raised up bottom. One thing I would note though, if I was to do it again, is that it would be better with ties on, as it does slip off the chair a bit.

booster chair little button diaries 14b

booster chair little button diaries 17      booster chair little button diaries 15

If you like our blog, we would love you forever if you could take a tiny two seconds to nominate us for the Best Craft Blog at the 2015 BIB awards… click below to vote. Scroll to section 12 and select us. Thank you!

craft bibs 2015

Tia x


Do I Really Have a 3 Year Old?

Blimey, apparently I do! Amelie turned 3 on Tuesday (happy sad face). We celebrated with a little joint party with her friend Robin. They had a lovely day and the sun even decided to put his hat on, hip hip hip hooray.

So I have a 3 year old. I’m sitting here trying to think of something to say that isn’t a massive cliche, and I’m struggling. Its all true, I can’t say it another way. Time does fly, things do change without you noticing. That tiny little baby is a big, pant-wearing, sentence-forming girl and it has come out of nowhere. I’m terrified I’ll blink and she’ll be a teenager, how do I slow it down! Note to self: Start treasuring every single moment…

Happy Birthday Amelie.

Amelies birthday 9Amelies birthday 10 Amelies birthday 11Amelies birthday 2 Amelies birthday 3Amelies birthday 1 Amelies birthday 4Amelies birthday 5

Thank you Laura for taking these snaps!

Tia x

Champagne & Gold Leaf Celebration Cake

champagne and gold leaf wedding cake

I recently attended a wedding of two very good friends of ours. Their DIY craft inspired celebration was beautiful. Instead of having one wedding cake, they asked willing guests to each make one, leading to a trestle table FULL of beautiful sweet treats. Deciding what to bake for the occasion was tricky…. I thought champagne and glitz are standard elements of a wedding so I made a champagne and gold leaf celebration cake.

To make the sponges you will need:

  •  200g unsalted butter
  •  200g caster sugar
  •  200g plain flour
  •  4 eggs
  •  2 tbsp baking powder
  •  A few drops of vanilla extract

To make the buttercream you will need:

  •  350g unsalted butter
  •  700g icing sugar
  •  Champagne, or a good quality sparkling wine (6-10 teaspoons)

To decorate:

champagne and gold leaf wedding cake

1. Preheat your oven to 180 degrees. Begin by making your sponges. Cream the butter and sugar together in a bowl. Then add half the eggs and flour and mix. Add the vanilla, baking powder and remaining eggs and flour and combine well. Divide into two sandwich tins and bake for 30 minutes (insert a skewer into the mixture and if it comes out clean it will be ready to remove from the oven).

champagne and gold leaf wedding cake

2. Whilst the cakes are cooling, make the buttercream, Beat the butter until it is light and fluffy. Add the icing sugar and beat until the mixture is combined. Add teaspoons of champagne, one at a time, until you have your desired strength of taste. Then, sandwich the sponges together with buttercream and spread a thin layer around the top and sides as a crumb coat. Place in the fridge to chill.

3. Add a second layer of buttercream and smooth it with a palette knife. Learning how to make cakes super smooth is definitely on my to do list. If anyone has any tips then please let me know!

champagne and gold leaf wedding cake

4. I wanted to keep the decoration really simple for this cake, so I scored the word ‘love’ onto the top using a skewer.

champagne and gold leaf wedding cake

5. The final glitzy touch to the cake is a sprinkling of gold leaf. This can be really fiddly to apply so use a cocktail stick to pick it up and place it into the centre of the heart. When you peel the gold leaf off the sheet, it will shrivel up, so only take it out when you’re ready to place it on the cake.

champagne and gold leaf wedding cake

Many congratulations to the happy couple, and may your lives together be filled with lovely cake!

 ~ Laura xx ~

Life In Pictures

Life in Pictures is our weekly mini-gallery of what our Little Buttons have been up to over the past seven days. This week we’ve been visiting bluebell woods (although the bluebells decided not to join us) and enjoying the 3 minutes of sunshine splashing in the Diana Memorial fountain in London and seeing the sights.

diana fountain 5 diana fountain 2 diana fountain 4 arlington bluebell walk 4 arlington bluebell walk 3   arlington bluebell walk 1 arlington bluebell walk 6Bluebell wood Little Button Diaries Bluebell wood Little Button Diaries Bluebell wood Little Button Diaries Bluebell wood Little Button Diaries little button diaries little button diaries

Cupcake Piñata

Cupcake piñata DIYHooray, our latest project for Hobbycraft is now live on their blog! It’s a whacking big piñata cupcake. Perfect for an outdoor celebration. To see the full tutorial of how to make it visit the Hobbycraft blog.

Kids cupcake piñata hobbycraft

craft bibs 2015We’re really lucky to have been shortlisted for a craft award for the Bibs2015 awards. If you two minutes spare, please can you vote us for Best Craft Blog (section 12 of the form). Thank you so much!

~ Laura & Tia xx ~

Brilliance in Blogging Awards 2015

thank you photo

We were very very happy to learn this week that Little Button Diaries have made the shortlist for the Bibs. The Brilliance in Blogging Awards, are the bees knees of blogging awards so we’re obviously very excited (and still in shock!) at making the shortlist.

We’re up against nine other great blogs for Best Craft Blog. If you like our blog, we’d be so grateful if you could spare a teeny tiny two minutes to vote for us. All you need  to do is click into the form, scrolling down to section 12 to select us, Little Button Diaries.

craft bibs 2015

Thank you so much for reading our blog and for all your lovely support.

~ Laura & Tia xx ~


Frozen Elsa Cake Video Tutorial

frozen elsa cake tutorial from little button diaries

A couple of weeks ago my gorgeous little niece turned 8. Like 99.99% of all 8 year old girls, she loves Frozen. Obviously we had to have a cool little Frozen themed party to celebrate, and OBVIOUSLY we had to have an Elsa cake. This cake is pretty easy to make – the only tricky bit is the pancake flip of the rolled out icing onto the cake. Yikes. It takes a little time, but you have nothing better to do right?

Here is a little video showing you how to make the cake – with full instructions below.

You will Need:

  • 3 cakes (2 made from a 20cm cake tin and 1 from a 1L pudding basin)
  • Butter icing (enough to cover and fill 1 large cake)
  • 1kg pale blue Fondant Icing
  • Icing sugar
  • Sprinkles – Icicles and baubles
  • Pale blue cake dust?
  • 3″ cookie cutter
  • An Elsa doll

1. Begin by placing your base cake on a plate and, using a cookie cutter, cut and discard (read: eat) the centre. Spread buttercream onto the cake and repeat the process with the other two cakes, stacking them up. The buttercream does not need to go to the edge as you will be trimming this away. Now take a bread knife and shape the cake to resemble a dress shape.

 frozen doll cake little button diaries 30 frozen doll cake little button diaries 1

2. Spread buttercream thickly all over the cake.

frozen doll cake little button diaries 3 frozen doll cake little button diaries 4

3. Place a ruler down the centre of the cake to check the height against that of the doll. If it needs to be a little taller, roll a small lump of icing and cut a hole with the cutter, and place this on top.

frozen doll cake little button diaries 5

4. Wrap a tape measure over the cake to work out what size your icing needs to be. Place a couple of sheets of cling film on your work surface, sprinkle with icing and roll it out to about 3mm thick. Now for the scary bit. Gently pick up the clingfilm underneath the icing and quickly place it on top of the cake. EEEEEK! Ease out any folds immediately before they tear the icing. This is a bit of a no-going-back moment!

frozen doll cake little button diaries 6 frozen doll cake little button diaries 7

5. Smooth out the lumps and tease the icing so that the folds resemble a skirt. When you are happy with how it hangs, trim away the loose ends with a sharp knife. Use the cutter to cut a hole through the top of the icing. Wrap clingfilm around the waist and legs of the Elsa doll and insert her into the top of the cake.

frozen doll cake little button diaries 8 frozen doll cake little button diaries 9

6. Cut a strip of icing, about 3″ long, and wrap it around her waist. Cut off the loose ends neatly and smooth in place. Mix a paste by combining a couple of tablespoons of icing sugar with about 1/4 teaspoon of water. Use this paste as a glue to attach the frozen embellishments and decorate the skirt.

frozen doll cake little button diaries 10 frozen doll cake little button diaries 11

Finally, dust the cake with a little pale blue edible glitter for an extra bit of icy shine.

frozen doll cake little button diaries 12

She’s finished! She took a while to make it, but it was very worth it to see the look on Elsa’s (and Elsa, Elsa and Elsa’s) face.

frozen doll cake little button diaries 25 frozen doll cake little button diaries 17 frozen doll cake little button diaries 22 frozen doll cake little button diaries 20

Tia xxx

Felt Scrap Alphabet and Drawstring Bag

bag alphabet and drawstring bag DIY

I have a tremendous amount of scrap bits of felt and fabric that lie in a box waiting to be used. After having a Spring clean I decided to use up my scrap felt to make an alphabet for my Little Button, along with its own fabric bag.

To make the alphabet you will need:

  • Enough scrap felt to make 52 letters
  • White thread
  • Pins

To make the bag you will need:

  • Scrap fabric measuring 16 inches x 12 inches
  • 30 inches cotton tape
  • Safety pin

1. Begin by deciding what size and font you want your letters to be, and printing them out. My letters measured 3 inches high. I used Arial bold font in Microsoft Word and printed out a template.

felt alphabet diy

2. Next, pin each letter onto two pieces of felt and cut them out.

felt alphabet diy

3. Pin them together and sew. Trim the excess threads and neaten up the edges.

felt alphabet and drawstring bag tutorial

4. To make the bag you will need 2 pieces of fabric cut to 8 inches x 12 inches. Begin by placing your fabric right sides together.

felt alphabet and drawstring bag tutorial

5. Sew the fabric together. Begin down one side starting 2 ½ inches from the top. Sew and backstitch at the start and sew down one side, along the bottom and up the other side, stopping 2 ½ inches from the top on the other side. Backstitch to secure.

felt alphabet and drawstring bag tutorial

6. To make the drawstring part, iron your seam closed and sew. Repeat on the other side.

 felt alphabet and drawstring bag tutorial felt alphabet and drawstring bag tutorial

7. Next, fold the top over twice making sure the tie can easily fit through. Sew along the bottom of this section to secure it in place. Repeat on the other side of the bag.

 felt alphabet and drawstring bag tutorial felt alphabet and drawstring bag tutorial

8. Using a safety pin, thread the cotton tape through the top and secure with a knot.

This project was as easy as…well A-B-C! The bag is also perfect for storing a few toys in.

felt alphabet and drawstring bag tutorialfelt alphabet and drawstring bag tutorial

If you like our blog, we would love you forever if you could take a tiny two seconds to nominate us for the Best Craft Blog at the 2015 BIB awards… click below to vote. Scroll to section 12 and select us. Thank you!

craft bibs 2015

 ~ Laura xx ~