Life In Pictures: Meeting the Easter Bunny

Last week we were invited to go and meet the Easter bunny for breakfast! We were greeted by Alice (of Alice in Wonderland) and sat down to a table decorated with Easter goodies. After a full breakfast, we decorated Easter biscuits and then the Easter bunny arrived with a fluffy rabbit and chocolate for the Buttons. Thank you to Wyevale Garden Centre for having us – we can’t wait to come back and meet Father Christmas!

little button diaries little button diaries little button diaries  little button diaries  little button diaries  wyevale garden centre brighton easter6wyevale garden centre brighton easter2 wyevale garden centre brighton easter3 wyevale garden centre brighton easter4 wyevale garden centre brighton easter5 little button diaries little button diaries


~ Laura & Tia xx ~

Kids Projects: Cardboard Tube & Egg Box Easter Animals

kids projects - cardboard bunnies and chicks

Hooray it’s Easter weekend! If you fancy getting stuck into some craft with the kids then try our cardboard tube and egg box bunnies and chicks. For our four full tutorials hop on over to Hobbycraft:

Happy Easter!

~ Tia & Laura xx ~

Kids Project: Easter Party Makes

kids easter party makes little button diaries

We’ve been busy little bees over on the Hobbycraft Blog, doing lots of tutorials for things to make for Easter. So why not (bunny) hop over to Hobbycraft to see how to make these Felt Pinwheels, Easter Bunting, little Egg Animals and a painted Mache Egg table decoration, complete with video tutorial.

~ Tia & Laura xx ~

Peek-a-Boo Carrot Cupcakes

carrot   IMG_8035 IMG_8037

My father-in-law is a keen gardener and has an impressive array of vegetables growing in his garden. I created these peek-a-boo cupcakes for his birthday as a nod to his green fingers.

To make 12 cupcakes you will need:

For the sponge:

  • 250g unsalted butter
  • 250g caster sugar
  • 250g self-raising flour (sifted)
  • 4 eggs
  • 2 teaspoons of baking powder
  • Orange food colouring gel
  • Cocoa powder

For the ganache:

  • 450g dark chocolate
  • 200g unsalted butter

For the topping:

  • Grated dark chocolate
  • Ready to roll green icing

1. Begin by preheating the oven to 180 degrees. Cream the butter and sugar together. Add the eggs and combine. Fold in the flour and baking powder until fully mixed.

IMG_7947

2. Line a baking sheet. Take a quarter of the mixture and scoop into a separate bowl. Add the orange food colouring and stir until the mixture is bright orange.

IMG_7950

3. Spoon onto the baking tray and smooth using a palette knife. Cook for approximately 8-10 minutes or until done. Leave to cool.

IMG_7977

4. Once cooled, cut into triangles so they resemble carrots. They need to be the length of the cupcake case, and you need two per cake. Place on a lined baking tray and pop in the freezer to harden a little.

carrot carrot

5. Add the cocoa powder to the remaining cake mixture and mix until combined. Half fill the cupcake cases. Remove the carrots from the freezer and place two back to back in the centre of the cupcake. Cover the carrots with the remaining cake mixture. Place in oven for 20 minutes or until cooked. Transfer to wire cooking rack and leave to cool.

IMG_7981 IMG_7982

6. Whilst the cakes are cooling make the soil and leaves. For the soil, grate dark chocolate. For the leaves, roll the icing out to 0.5cm in thickness. Using a sharp knife, cut out leaf shapes and add small details onto the top of the leaves.

IMG_7988 carrot cake

7. Next, make the ganache. Melt chocolate then add butter and stir until melted. Once the ganache has cooled (but isn’t set) pour on top of the cakes.

IMG_8040

8. Sprinkle the grated chocolate on top so it resembles soil and arrange the leaves in the centre of the cake.

IMG_8045

These would also look great on your Easter table.

~ Laura xx ~

Kinder Bueno Cupcakes

kinder bueno cupcakesIt was Tia’s birthday recently and knowing her love of Kinder Bueno I made her these little gems. The sponge is packed with Kinder chocolate chunks and the buttercream is flavoured with hazelnut. In the words of my Little Button: de-lic-ious!

To make 12 cupcakes you will need:

Sponge:

  • 350g plain flour
  • 1 tsp baking powder
  • 100g butter
  • 200g caster sugar
  • 3 eggs
  • vanilla extract
  • 175ml milk
  • 4 Kinder chocolate bars, chopped

Hazelnut buttercream:

  • 175g unsalted butter, softened
  • 250g icing sugar
  • 2 tbsp milk
  • 3 tbsp Nutella

Topping:

  • 2 Kinder Buenos
  • 100g dark chocolate

kinder buneo cupcakes

1. Begin by preheating your oven to 180 degrees.  Then, cream the butter and sugar together.

kinder buneo cupcakes

2. Add the eggs and combine. Next, fold in the sifted flour and baking powder to the mixture.

kinder buneo cupcakes

3. Chop the Kinder chocolate into chunks and stir into the cake mixture. At this stage a lot of the Kinder chocolate didn’t quite make it into the sponge!

kinder buneo cupcakes

4. Separate the mixture into cupcake cases and fill them so they are three-quarters full.

kinder buneo cupcakes

5. Bake for 2o minutes or until the cakes are cooked. Remove the cakes from the oven and leave to cool.

kinder buneo cupcakes

6. To make the buttercream, beat the butter until it’s light and fluffy. I did this for about 10 minutes.  Add the icing sugar and mix until combined. Then, add the milk and Nutella to the mixture and mix until the buttercream is a consistent light-brown colour.

IMG_8961

7. Pipe or spread the buttercream onto the cooled cupcakes.

kinder buneo cupcakes
8. Melt the dark chocolate and pour into a piping bag. Pipe in lines over the cupcakes to resemble the top of the Kinder Bueno. This doesn’t have to be precise.

kinder buneo cupcakes kinder buneo cupcakes

 9. Finally,  break the Kinder Bueno into pieces and stick into the top of the cakes.

kinder buneo cupcakes

These turned out to be really creamy and light cupcakes and a real treat!

~ Laura xx ~

Salted Caramel Millionaire Shortbread

 mini egg salted caramel millionaire shortbread recipe

As it’s nearly Easter I’ve been on the hunt for some recipes to try for next weekend. When I came across this on Good To Know Recipes I knew I had to try it! The recipe was easy to follow and the results were so good (even if I say so myself!). Because this is such a sweet treat you only need a little slice. It was such a hit in our house that I can’t wait to try Good To Know Recipes other mouth-watering delights.

For this recipe you will need:

For the shortbread base:

  • 150g butter
  • 75g caster sugar
  • 200 plain flour

For the salted caramel:

  • 150ml double cream
  • 100g light muscovado sugar
  • 20g salted butter
  • Pinch of sea salt

For the chocolate topping:

  • 200g milk chocolate
  • 1 pack Mini Eggs

mini egg salted caramel millionaire shortbread recipe

Begin by preheating the oven 180°C. To make the base, beat the butter and sugar until pale. Add the flour and mix until combined. Tip the mixture into the baking tray and bake for 30 minutes until golden, leave to cool.

mini egg salted caramel millionaire shortbread recipe mini egg salted caramel millionaire shortbread recipe

To make the salted caramel, place the cream, sugar and butter in a small pan and heat gently, stirring until the sugar has dissolved and the butter has melted. Bring the mixture to the boil and then simmer for 2 minutes until it begins to thicken. Add the salt. Pour the salted caramel over the cool biscuit base and leave to cool in the fridge for about 20 minutes.

  mini egg salted caramel millionaire shortbread recipe mini egg salted caramel millionaire shortbread recipe

Crush the Mini Eggs in a small sandwich bag using a rolling pin.

mini egg salted caramel millionaire shortbread recipe mini egg salted caramel millionaire shortbread recipe

To make the topping melt the chocolate. Pour over salted caramel and sprinkle with the Mini Eggs. Pop in the fridge until you are ready to serve.

 salted caramel millionaire shortbread baking recipe mini egg salted caramel millionaire shortbread recipe

Happy Easter!

~Laura xx~

Exciting News & Easter Goodies

how to make your own toy bunny tutorial

We’re really happy to announce that, as of today, we are going to be regular bloggers on the Hobbycraft website! This is so exciting for us as Hobbycraft is our absolute favourite place on the planet (we’ve happily whiled away many a Saturday in there with bored husbands sitting outside!)! The craft superstore have an excellent blog full of different craft tutorials. We will be bringing you monthly craft projects and our first one is this cute Easter bunny rattle. For the full tutorial hop over to Hobbycraft’s site.

how to make your own creme eggs

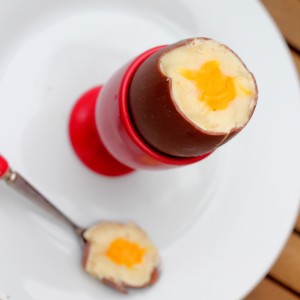
We are also featuring over at Brighton Mums – a site which celebrates parenthood in Brighton and has a variety of interesting lifestyle posts. We will be bringing you baking and craft delights monthly. We started with how to make your own Chocolate Creme Eggs. (warning – these are awesome and addictive).

If you are looking for more Easter treats then there is still time to make our bunny dresses and our mini hot cross bun bites! Click on the photos for the full tutorials.

How to make a children's bunny dress tutorial mini hot cross bun bites recipe

We’re super lucky to have made the finals of the MAD Blog Awards, the parenting blog awards, for Best Craft Blog. If you have time, please could you vote for us here. Thank you!

MADS-2013-FINALIST-Badge

~ Laura & Tia xx ~

Hot Cross Bun Bites


mini hot cross bun bites recipe

With Easter fast approaching I wanted to try to make a treat for Little Button and myself. But at one year old, she’s only just getting used to ‘grown-up’ food, and a lot of treats are for big appetites only. So we’ve been doing a lot of – well, what’s the opposite of super-sizing? – shrinking. Hence: Hot Cross Bun Bites – just big enough for little hands.

To make 24 bites you will need:

  • 450g white bread flour
  • 65g caster sugar
  • 7g pack of dried fast-action yeast
  • 300ml full fat milk
  • 65g butter, melted
  • 1 egg, lightly beaten
  • 75g mixed dried fruit

For the crossing top:

  • Enough flour and water to make a thick paste


mini hot cross buns recipe

Measure out the flour, yeast and sugar into a mixing bowl. Gently heat the milk and add it to the flour mixture along with the egg and butter. Mix until all the ingredients are combined and the dough is sticky.

mini hot cross buns recipe

Turn the dough onto a lightly floured surface.

   mini hot cross buns recipe mini hot cross buns recipe

Knead the dough until it is elastic and smooth (about 5 minutes). Get some little hands to help you if you have some available!

mini hot cross buns recipe

Put the dough into a bowl with cling film over the top to rise for approximately 2 hours (or until it has doubled in size).

mini hot cross buns recipe

Once the mixture has risen, let some of the air out of it by pushing the heel of your hand into it. Add in the dried fruit and knead until it is combined. Place back in the bowl for another hour with cling film on top again. Preheat the oven to 190 degrees C.

mini hot cross bun bites recipe mini hot cross bun bites

Roll into ping-pong sized balls and lay them spaced out on a baking tray. To make the crosses, mix a thick paste using water and flour. I used a spoon to draw the crosses on but a piping bag would be even neater.

mini hot cross bun bites recipe mini hot cross bun bites recipe

Place in the oven for 15 minutes or until the buns are golden brown. Serve warm or toasted with a dab of butter.

~ Laura x ~